 This is an easy way to age someone either subtly or dramatically. There are a variety of methods for creating age-simulating wrinkles, too. However, trying to age someone in their late teens to late 20s might be ineffective with this technique because for it to work well there needs to be some stretch and pliability to the skin. Young skin is often too firm and taut to stretch enough for the stipple technique to be noticeable. However, combined with more traditional makeup techniques of highlight and shadow, and with prosthetics, aging can be convincingly achieved.
The most common aging stipple technique involves using latex; it can be done in 16 stages, with each stage involving five steps, or it won’t work. Remember that skin stretches perpendicular to the pull of the muscle beneath it. Also, only do those parts of the face that require aging for the particular makeup.
![]()
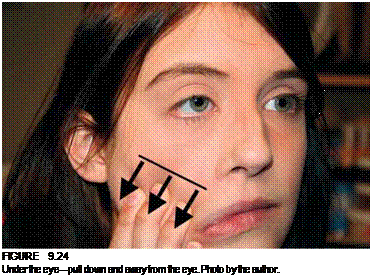 Temple—pull up above the temple and pull down below to create crow’s feet outside the eye.
![]()
![]() Temple—pull up above the other temple and pull down below to create crow’s feet outside the eye.
Temple—pull up above the other temple and pull down below to create crow’s feet outside the eye.
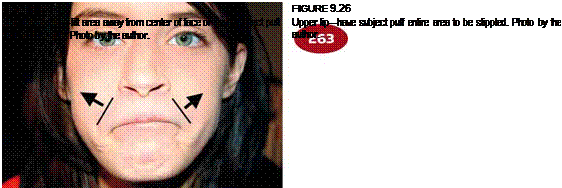 |
Nasolabial fold—lift area away from center of face or have the subject puff area to be aged.
8. Nasolabial fold (other side) —lift area away from center of face or have subject puff area to be aged.
9. Upper lip—have subject puff entire area to be stippled.
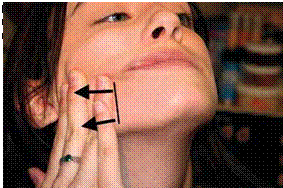
10. Chin—with neck arched, pull the side of the chin away from the center of the face.
Latex may have strong ammonia smell, so be prepared to use a fan of some sort.
 |
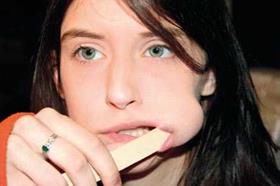 |
figure 9.28

Cheek—using a large craft stick (tongue depressor), have your subject carefully reach deep into the cheek inside the mouth and push out. Photo by the author.
11. Chin—with neck arched, pull the other side of the chin away from the center of the face.
12. Cheek—using a large craft stick (tongue depressor), have your subject carefully reach deep into the cheek inside the mouth and push out. This will help tie the nasolabial folds and under-eye areas together.
13. Cheek—have your subject carefully reach deep into the other cheek and push out.
14. Neck—begin with the head tilted back to stipple the throat first.
15. Neck—now with the head turned one way.
16. Neck—now with the head turned the other way.
Again, the steps:
1. Stretch the skin.
2. Apply the latex. It does not have to be applied heavily; apply it thinly. Two layers are often enough.
![]()
3. Dry the latex.
4. Powder the latex.
5. Release (unstretch) the skin.
Excess powder should be removed with a small amount of water-soluble lubricant (such as K-Y® jelly) on a small brush. To color the latex, you can use RMGP, but it is not absolutely necessary. If you first brush a thin layer of castor sealer over the latex, you can use regular creme colors to paint the latex; if you don’t use the castor sealer, the latex will absorb the carrier vehicle of the creme makeup and result in a discoloration of the latex that won’t match the rest of the skin.
Latex can be used as a contact adhesive and acts as such. If latex dries on the applicator you are using to add age stipple and dries on the skin, when the two come in contact with one another they will bond and you will either pull up the latex from your subject’s face or your subject will have an applicator stuck to her face.
There are several additional techniques for aging that involve latex and other materials, but I list merely some of them here. These provide more extreme effects, each with its own unique characteristics:
![]() Latex and tissue
Latex and tissue
Latex, tissue, and adhesive
Latex, cotton, and adhesive
Latex, cornmeal, wheat germ, or bran and adhesive Green Marble SeLr® and Attagel
