Terra alba will accelerate the cure of plaster; so will a bit of salt; so will warm water. However, hot water will actually inhibit or prevent the cure of plaster, so be careful with the temperature; test beforehand. White vinegar added to the water in small amounts will retard, or slow, the cure of plaster.
of using plaster bandages. The reason the Dave Parvin dislikes using plaster bandages—and I understand his point—is that if the first layer of plaster bandages has already started to set up when you begin to add the second layer and you accidentally press too hard and create an indentation, the plaster will not spring back. That will also cause an indentation in the alginate and will result in an indentation in the stone positive when it is cast.
It is important to note that not all plaster bandages are created equally; some contain more plaster than others. Gypsona® plaster bandages seem to be quite popular; I use them frequently. They are similar to Specialist® bandages (made by Johnson & Johnson and BSN). I also use Cliniset® bandages from EBI; they can be purchased from FX Warehouse in Florida. You’ll find a comprehensive appendix of suppliers in the back of this book. There are several brands available; it is important to find one that has a lot of plaster impregnated into the fabric of the bandages. Woodland Scenics® sells a plaster bandage used for model railroad scenic construction; it has the most plaster of any bandage I have ever used and it is also by far the most expensive.
Brushing on plaster as a substitute for plaster bandages can be done in the following way. Note that the logistics of this process dictate that it should be attempted only when two people are creating the lifecast, not one:
■ After the cotton fuzz or cheesecloth has been pressed into the uncured alginate (the alginate should now be fully set), mix up a shallow bucket of impression dental plaster (set time 2-3 minutes) and use a 2- or 3-inch chip brush to brush on a layer of plaster over the fuzz-covered or cheesecloth-covered alginate, making sure to continue keeping the subject’s nostrils open. Use a 2-inch brush on the face; a 3-inch brush is a bit too big. Rinse your chip brushes in a bucket of water before the plaster sets, to keep them viable for more than one application.
■ As soon as this layer has been brushed on, the second person will begin gently applying a layer of cheesecloth to the wet plaster, matching the contours of the alginate and plaster. Repeat this step. Your plaster shell should be about 3/16- to %-inch (5-6.5 mm) thick. You can also add cut fiberglass fibers to the remaining plaster and spread it onto the mold by hand for added strength.
■ After the plaster has heated and then begun to cool, it is cured and you can remove the mold from your subject.
Now let’s resume the step-by-step application of plaster bandages for the support shell:
21. Use some of the smaller cut pieces of plaster bandage across the bridge of the nose horizontally, and the thin strips along the ridge of the nose and over the septum between the nostrils and the upper lip. Be careful to keep the nostrils unobstructed. It would be a shame to risk starting over when we’re almost ready to make our positive!
22. When the plaster shell has set up – remember, plaster heats up when it is curing—that is, it is beginning to cool (about 15 minutes), it’s time to remove the mold from your subject’s face. I assure you, she is ready, too. Total time to this point—including the bald cap application—should be somewhere between 30 and 45 minutes, on average. Variables will be the alginate you use, water temperature, and so on. The actual application of plaster, whether with bandages or brushing on with cheesecloth, may take about 12-15 minutes.
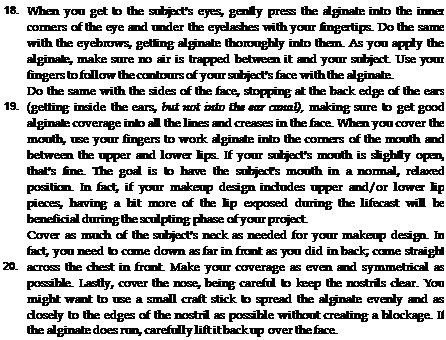
23. To remove the mold, ask your subject to begin puffing out her cheeks and wiggling her face. This will help begin to break any suction between the alginate and skin, and the mold will begin to separate. Have your subject lean forward slightly and help by cupping their face in their hands while you begin to separate the mold from the bald cap at the top of their head.
It is possible that your subject might feel some resistance on the eyelashes and eyebrows and on any facial hair that was exposed, such as sideburns or moustache. Not to worry, unless you forgot to release them with cholesterol cream or petroleum jelly! The alginate will let go, though you could find a stray hair or two left in the alginate.
24. Ask the subject to keep her eyes closed because the sudden change in lighting could be uncomfortable after this much time. The lifecast should now easily pop off into your hands.
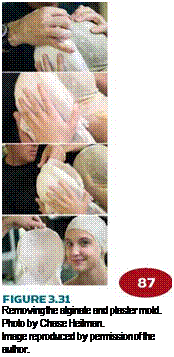
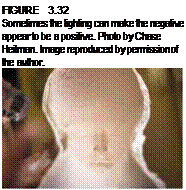
You now have a negative mold of your subject’s face. Take a close look to examine it. A few minor air bubbles are nothing to be concerned about. Those can easily be cleaned up once the positive has been made. More serious imperfections may require that the entire process be repeated. Let’s hope not! If all is well, we need
to make our positive before the alginate begins to dry. If the alginate is thin at the edges, it could already be changing color and drying. It doesn’t take long. When the alginate dries, it shrinks; it is mostly water, after all. If you are working with another person, you might want to have him or her help get your subject cleaned up while you prepare to make the stone positive. If you are working alone and your subject needs your help to remove the bald cap, put some wet shop towels inside the alginate mold and around the edges to keep it moist until you are ready to make the positive.
Before you begin to mix the Ultracal for the positive, you need to plug the nostril holes in the lifecast mold, or the Ultracal will run right out of the mold. You can either use a small piece of WED clay or oil clay into the holes or mix up a small amount of dental alginate to fill the holes. Be very careful not to push whatever you use too far into the cavity or you risk deforming the nose and ruining the positive. If you don’t know what WED clay is yet, I will tell you: WED clay is water-based clay that contains glycerin so it will stay moist longer. WED stands for Walter Elias Disney; it was developed for Disney sculptors to create maquettes for Disneyland attractions.
Now do the following:
1. Place the lifecast upside down, supported in a shallow box.
2. 
![]()
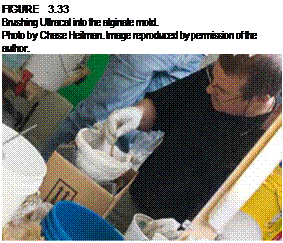
Wearing gloves, pour about a cup of water in a small plastic bucket, then sprinkle Ultracal into the water with one hand while stirring with your other hand. Continue to add Ultracal powder until it is about the consistency of a milkshake—not too thick and not too runny. (If you’re interested, the official mix ratio for Ultracal is 38 parts water to 100 parts Ultracal by weight.) You are going to create a detail layer in the mold and brush it into every nook and cranny of the negative with a 1-inch chip brush. Brush the Ultracal into the negative and bring it up the sides of the mold. You can take your time with the Ultracal since it won’t begin to set up for 15 or 20 minutes. Jostle and tap the mold to release any trapped air bubbles from its surface. You will notice that the Ultracal liquefies even more when it is jostled
and shaken, so you will need to brush it up the walls of the mold again.
The goal of this step is to create a pure Ultracal detail layer about %-inch (6.5 mm) thick over the entire surface of the alginate negative. It is up to you whether or not to use Acryl® 60 or another acrylic fortifier when you mix the Ultracal. It will add strength to your stone positive, and that will be an advantage if you will be making your appliances with foam latex. (Adding acrylic fortifier will also make repairs easier when mixed 50/50 with water.)

If you need more Ultracal than you initially mixed, add a little more water and then more Ultracal and continue with the detail layer.
When you’re done with the detail layer, you might want to rinse out your chip brush in a cup of water so you can use it again. Whatever you do, don’t rinse it in the sink or pour any uncured Ultracal down the drain! Ultracal will set up even under water, and if it sets in your pipes, you will help your plumber buy a lovely vacation home in Europe or the Caribbean. Any excess Ultracal you still have in a small mixing bucket can come in handy later as a mold base. Once the Ultracal has gone through its curing process, you can just pop it out of the bucket and set it aside somewhere handy.
Now:
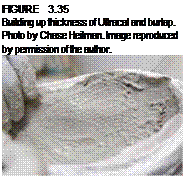
3. After your detail layer has cured, in about an hour. . . actually, there are a couple of schools of thought on this: One says it’s better to let the Ultracal cure completely before applying a new layer to it (Ultracal will stick to itself); I find it’s better to add more Ultracal before the first layer completely cures. Just make sure it’s set up enough to hold its shape and not be affected by the next step. (When in doubt, and most certainly when you are getting accustomed to working with a new material, it is best to err on the side of caution until you really know the properties of the materials you’re working with.) Mix another batch of Ultracal, more this time than for the detail layer; the consistency of this batch should be that of a thin milkshake. We are going to be adding the burlap pieces in this step to add strength to our Ultracal. The burlap will act like rebar in concrete, as a strengthening support. Dip a piece of burlap into the Ultracal, then press it onto the Ultracal in the negative mold, making sure to eliminate any air pockets. Do this over the entire mold, overlapping the pieces of burlap. You can even use pieces of cheesecloth or chopped fiberglass fibers. We want to build up two or three layers of Ultracal and reinforcing material and then a final layer of only Ultracal for a beauty layer. The final thickness of the positive should be about an inch.
4. As the beauty layer is beginning to set, use the rubber kidney tool to smooth the Ultracal. Again, anything worth doing is worth doing well. Even though few, if any, other people will see the finished stone positive, you should want it to look good.
Another reason is that if the surface is too rough, you could easily cut or scrape your hands when handling it during the other stages in your makeup creation. Try not to bleed on your mold.
5. 
![]()
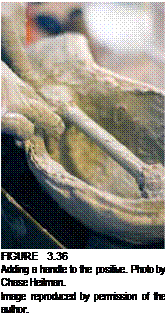
You need to make a handle for the positive. The handle can be added as the beauty layer is applied. There is a reason we don’t just make a solid stone positive—two reasons, actually: A solid positive would be heavy, and having no handle would make it awkward to manipulate and very difficult to lift from the negative mold we will make later of the sculpted prosthetic. Take the piece of metal conduit and place it across the back of the positive; it might need to lie at an angle. Dip two of the long strips of burlap into the remaining Ultracal and wrap one around each end of the metal handle, securing it to the positive.
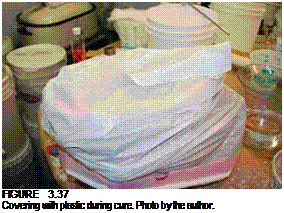
6. When you have finished smoothing the beauty layer and the handle, cover the mold with plastic. Remember that the plastic will help retain moisture as the Ultracal heats during its cure, adding additional strength.
7.
 |
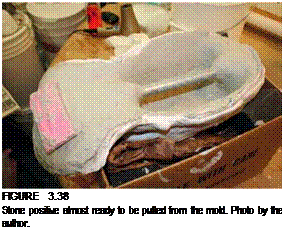 |
After your positive has cooled, you can remove it from the alginate and plaster mold. Will it look good? Will there be huge air bubbles? Is the nose deformed? Will you have to start over?! It’s time to find out. With your fingers, begin to gently pry the plaster and alginate shell away from your Ultracal positive around the edges. As the mold begins to pull away from your positive, it should begin to loosen more and more, to the point where you can grab the handle and pull it out of the mold.
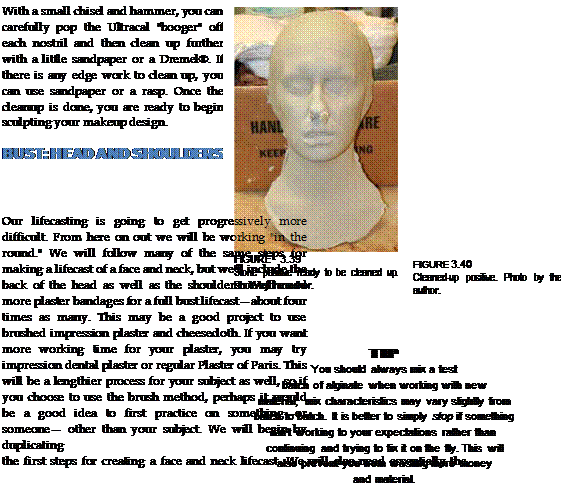
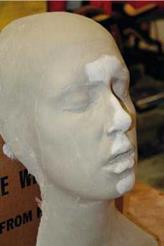
There may well be some small bubble blemishes on the surface, but those are easy to chip away, and if there are any holes, unless they are enormous, they should be easy to patch and fill by mixing a bit of Ultracal with Acryl® 60/acrylic fortifier and water (1:1 ratio). There is always a bit of cleanup to do on a positive, especially at the nostrils because they were left open and then had to be plugged.
![]()
 |
|||
|
|
||
![]()
![]()
Latex, vinyl, or nitrile gloves
1- inch chip brushes Cholesterol conditioner, petroleum
jelly, K-Y® Jelly
%-inch metal electrical conduit
(about 7 inches (8 cm) long)
WED clay or (sulphur-free) oil clay
Cotton or cheesecloth (cut in short pieces)
Loosely woven burlap (cut into 4 x 4-inch and 3 x 6-inch pieces)
Drill with Jiffy-Mixer®
2- gallon plastic bucket Masking, gaffer’s, or duct tape 1 roll of plastic wrap
Large craft sticks Ultracal Eyebrow pencil
Thermometer
Comb or hair brush
Rubber kidney tool
Large plastic sheet or trash bag
Utility knife and plaster rasp Clock or timer
%-inch (19 mm) round router bit
1. Cut the plaster bandages into lengths of about 8, 10, and 12 inches (20, 25.5, and 30.5 cm). Also cut several thin strips that will be used to reinforce the nose, just as you did for the face and neck lifecast. Premeasure the alginate you will be using into a plastic container. Also premeasure the amount of water you will need into one of your larger plastic containers. You might want to use the 2-gallon bucket even though we’re not mixing a large batch of alginate, because the Jiffy-Mixer is likely to cause some splatter. The water temperature should be about 80oF (about 27oC).
Again, you can certainly use cooler water or warmer water; an 80oF (about 27oC) water temperature is comfortable for most people. If you recall, cooler water will cause the alginate to set more slowly; warmer water will accelerate the set time. Cooler water will give you more working time, but I guarantee that warmer water will be more comfortable for your subject. Again, refer to the recommendations of the particular alginate you are using since they may differ somewhat as to the ratio of alginate to water. With many alginates, a ratio of 5-5% oz. of alginate per 1 lb. (16 oz.) of water will give you a nonrunny, workable mixture that spreads easily and stays where you put it.
EnvironMolds’ MoldGel actually mixes best with a ratio of 3.5-4 oz. of alginate per 1 lb. (16 oz.) of water. We’ll go with 4 oz. per pound of H2O; so, for a head and shoulders lifecast, front and back, we will need approximately 40 oz. of alginate, which means we’ll need 10 lb. of water (160 oz.). (In case you didn’t know, a gallon of water weighs 8.3 lbs. It’s math time again for those of you who need help: There are 16 ounces in 1 pound. If we need 4 ounces of alginate per 16 ounces of water, and we need 40 ounces of alginate, simply divide 40 by 4 to get the number of pounds of water we’ll need.)
TIP
Suppose you want to use less
than a pound of water or less than 4 ounces of
alginate (MoldGel). How do you determine how much you
need of each material? What is the ratio of alginate to water? It
is 4 oz. to 16 oz., or 4 divided by 16, which is.25, or *А; so a 1:4 ratio.
Therefore, if you want to use 2.75 ounces of water, you multiply
2.75 by.25 to get the amount of alginate, or.68 ounces. (There
are 28.3495231 grams to 1 ounce; .68 ounces is 19.27
grams, and 28.3495231 multiplied by.68 gives
the total in grams.)
We will be using EnvironMolds’ MoldGel.® We will need to work relatively quickly, but we do not want to hurry; we can work quickly and still not hurry. When you rush, you make mistakes.
2. Place your subject in a comfortable chair, preferably one that can be raised and lowered. Cover your subject’s body and clothing with plastic, carefully attaching the plastic with tape at least an inch below the level of your cast.
3. The next thing we need to do is apply a bald cap to our subject. You can refer to the earlier section for more information on how to put
on a bald cap for lifecasting.
4. 
Next, carefully start to secure the sides and back of the bald cap, making sure the cap will hold before moving on to the next section.
5. Since we are doing a full head and shoulders lifecast, you need to make sure the bald cap is glued down fully around the head. If your subject has long hair, take the time to flatten it well enough against your subject’s head or down the neck so it won’t create a bulge that
will be a problem to clean up. If hair sticks out below the bottom of the bald cap, be sure to thoroughly release it with cholesterol cream. Lastly, mark your subject’s hairline with the eyebrow pencil. This line will transfer to the alginate and then to the Ultracal.
6. Apply a small amount of cholesterol cream or petroleum jelly to your subject’s eyebrows, eyelashes, and any other facial hair. Use K-Y® Jelly or petroleum jelly to lightly cover the bald cap 1 inch beyond the line drawn across the top of your subject’s head. This will ensure that the alginate will not stick to the bald cap.
![]()
7. Before applying the alginate, explain to your subject what the procedure will entail and what the steps are going to be so that there will be no surprises during the lifecasting. It is very important that your subject have no trouble breathing through both nostrils, because the mouth will be completely covered with alginate.
8.  Now it’s time to mix the alginate. We will begin with the back of the head, neck, and shoulders. Look at the clock or start your timer when you begin to mix the water and the alginate powder so you’ll know how much time you have before the alginate begins to set. For this step we’ll need to mix half the alginate and half the water: 20 oz. of MoldGel® alginate and 5 lb. (80 oz.) of warm (80oF/27oC) water. Always add the alginate powder to the water, and not vice versa. Properly mixed alginate should not run, but never take anything for granted in such instances. It is also possible that you might need to add a very small amount of water to your alginate if it is too thick. Remember to keep talking to your subject as you spread the alginate, telling her what you’re doing and just letting her know that you’re still there and haven’t gone out for a cup of coffee. Since you will be starting at the back, it will be rather obvious that you’re still there.
 I’ve already said that I prefer to wear gloves; I can change gloves quickly and have clean hands immediately to continue working. Keep in mind that room temperature, water temperature, and your subject’s body temperature as well as how quickly or slowly you work will all affect the lifecasting. The alginate is also bound to stick to your hands, whether you’re wearing gloves or not. I also like to have an extra small bucket of water handy to dip my hands into; that helps keep the alginate from blobbing too much on my hands, which makes it easier to spread.
![]() Before spreading any alginate, dip your hands into the water, which will allow you to spread the alginate more easily without it sticking as much to your gloves or your skin. Then take a handful of alginate and begin to spread it with your hand, starting at the top of the head where the line is drawn between the ears and move downward on the back of the head toward the shoulders.
Before spreading any alginate, dip your hands into the water, which will allow you to spread the alginate more easily without it sticking as much to your gloves or your skin. Then take a handful of alginate and begin to spread it with your hand, starting at the top of the head where the line is drawn between the ears and move downward on the back of the head toward the shoulders.
10. Spread alginate behind and into the ears (if the ears are not covered by the bald cap) but not into the ear canal.
11. Before the alginate sets, add some fuzz while the alginate is still sticky.
![]()
12. Once the alginate has set, it is time to apply the plaster bandages to support the alginate. To make the mother mold, you will need to dip the precut strips of plaster into slightly warm water with a pinch of salt. You will definitely want to wear gloves for this task. Fold the plaster strip in half with the plaster side out, giving a double thickness of plaster bandage. Dip it into the water and carefully squeeze out most of the water before applying it to the alginate.
13. When you are finished creating the mother mold, there should be a buildup of
 about four layers of plaster. Make sure that your plaster strips overlap one another, with the thickest layers on the outside edges. Make your edges as clean as you can make them.
Press gently but firmly to make sure that there is no airspace between the alginate and the plaster. If you press too firmly, you risk creating a distortion in the alginate and the
resulting stone positive. In addition, if your mother mold is not thick enough, the weight of the stone when you make your positive could distort the shape of the mold, also ruining your cast. It’s better to use too much than too little. Plan accordingly.
14. Once the plaster shell has begun to cool, we can prepare to do the front. First clean off any plaster that got onto your subject’s face, neck, and shoulders that could interfere with the alginate. Furthermore, if the line of alginate across the head, neck, and shoulders is not straight and neat, you can neaten it by carefully cutting away the offending alginate with a dull palette knife.
15. Next, brush a line of petroleum jelly over the edge of the plaster mother mold, about 2 inches (5 cm) in width. It might help to add a bit of food coloring to tint the petroleum jelly so that it can be easily seen. Since most alginate will not stick to itself once it has set, we only need to make sure that the plaster will not stick to itself and encase your subject in a plaster and alginate case. Tincture of Green Soap is also a good release you can use, as is Murphy’s Oil Soap.
16. Now it’s time to mix the rest of the alginate. Look at the clock or start your timer when you begin to mix the water and the alginate powder so that you’ll know how much time you have before the alginate begins to set.
17. Spread the alginate with your hand; starting at the top of the head, spread the alginate up to and just beyond the alginate on the back half of your subject. Make sure that you get good contact along the edge so that there will be little or no seam between the two halves of alginate. Do this all the way around the edges and then spread alginate everywhere else, moving downward on the face and leaving the nostrils for last.
![]()
 |
|
 |
|
|

![]()
23. When the plaster has begun to cool, draw marks with a Sharpie or other marker to help line up the two halves again when you pour the stone positive.
Now it’s time to remove the mold from your subject. You might have to wake her up! This is the life – cast during which I have the most people fall asleep because it’s dark, quiet, and warm. Just as with the face and neck lifecast, ask your subject to begin puffing out her cheeks and wiggling their face. This will help begin to break any suction between the alginate and skin, and the mold will begin to separate. It will be a bit difficult for her, but have your subj ect lean forward slightly and help her by cupping her face in her hands while you begin to separate the mold from the back half of the mold and her body. Your subject could feel some resistance on the eyelashes and eyebrows and on any facial hair that was exposed. Not to worry, unless you forgot to release them with cholesterol cream or petroleum jelly! The alginate will let go, though you may find a stray hair or two left in it. Ask your subject to keep her eyes closed because the sudden change in lighting may be uncomfortable after this much time. When you’ve removed the front half of the mold, set it down somewhere safe and carefully remove the back half.
24. While your subject is getting cleaned up, mix a bit of dental alginate or grab a small chunk of WED clay and carefully plug the mold’s nostril holes so as not to deform the shape of the nose. Then put the mold halves back together carefully and secure the halves with duct tape, or you can take the time to wet some more strips of plaster bandage and wrap them around the mold to hold the pieces together. Examine the seam to make sure it is tight. If you’ve lined up the two halves properly, the seam should be almost invisible.
TIP
You might want to create a
flange and keys made of plaster for the
front and back halves of the mold instead
of overlapping the front and back; the two
halves can then be held together with
drywall screws afterward.
|
|
figure 3.42
When the mold halves are put back together, the seam should be almost invisible. Photo by the author.
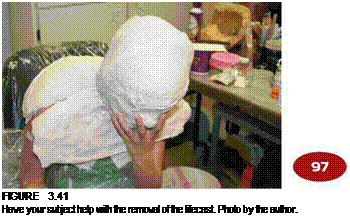
25. 
 Use a large bucket or sturdy box with foam or newspaper (or both) padding in the bottom to support the mold while the stone is poured.
26. Mix a large batch of Ultracal, enough to fill the head cavity up to the neck. It should not be too thick or too runny—about the consistency of a milkshake. There is a formula for mixing Ultracal: The mix-ratio is 38 parts water to 100 parts Ultracal by weight, but I’ve found—and anyone who works with Ultracal will tell you the same thing—that it’s easy to judge your mixture by eye and by feel. (How much you affect the structural integrity of the stone by not following the mix ratio is arguable.) Ultracal is easy to mix by hand; you should definitely wear gloves when working with it. Though the powder is fine, it is still abrasive, and like plaster it will draw moisture from your skin, so over time your skin will dry and crack. I didn’t use gloves the first several times I worked with it, and then while I was mixing a batch— for about the eighth or ninth lifecast of the day—I noticed that it was turning pink. . . Anyway, when you’re mixing the stone, add the Ultracal powder to the water a little at a time so there will be fewer lumps to break up as you mix with your hand. You can use a mixer if you want to, but since Ultracal has such a long working time, speed won’t actually gain you anything except quicker lump-free Ultracal.
27. Pour the Ultracal into the mold. With a gloved hand, reach inside and work your hand around the surface of the mold to dislodge air pockets. You can also gently bounce the bucket or box supporting the mold to dislodge air bubbles. Then, with your hand, bring some of the liquid Ultracal up the sides of the mold. We want to create a detail layer in this mold also, before adding layers of Ultracal with burlap. It should be about Vs inch to % inch (3-6.5 mm) thick.
28. Once the detail layer has begun to cool, you can begin to add Ultracal with burlap in three or four layers. We want our cast to be hollow because if we were to make it solid, it would be very heavy, unwieldy, and extremely difficult to work with. Your finished stone cast should be no more than an inch thick.
29. Cover the mold with a plastic bag so that it will strengthen during its cure. I’ve heard that retaining moisture while it heats will make the stone stronger. Whether this is actually true or not, I have not been told by a gypsum expert. As long as it does not purportedly make the stone weaker, there’s no reason not to give it a try. Because this is a larger stone cast than the face and neck cast, it will take longer to fully go through its cure process. In about two hours you can demold the bust.
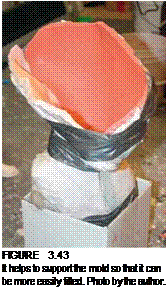
30. With a bit of luck, when you carefully pry apart the plaster and alginate mold halves, your stone bust cast should look just like your subject, only in Ultracal.
 |
![]()
![]()
![]()


![]()

TIP
A few drops of dish soap in
a spray bottle filled with water creates
wet” water; a very small amount of soap
will remove surface tension and allow
better surface contact between
alginate and skin.

