Altering the appearance of the teeth can add a significant dimension to a character makeup, and there are several ways to change the appearance of teeth to varying degrees. The easiest way is with tooth wax; a prosthetic device that fits over existing teeth is the most difficult. Fangs, decayed and rotting teeth, and the like can be achieved commercially from kits such as Billy Bob Teeth,® Dr. Bukk,® Scarecrow,® and Toothfairy Teeth® relatively inexpensively. There is also liquid tooth enamel (Mehron,® Kryolan,® Ben Nye®) that can be painted directly onto the subject’s teeth for different looks. Tooth enamel is for temporary use only.
However, if you want to have a set of truly unique and original teeth for your transformational character makeup, it will be necessary to create the teeth from scratch by first taking a cast of your subject’s teeth. This is especially important for theater or film work that requires your character to speak. The results can be quite amazing, but this is a complicated process that borders on professional dental work. I don’t really need to tell you this, but it is illegal to practice dentistry without a license. Common sense should also tell you that custom dental prosthetics for theater, film, and television work should never be worn for any extended period of time. They also should not to be worn while eating.
Taking impression dentals is easy enough that you can do it to yourself. It is actually not a bad idea to practice on yourself and become familiar with the procedure before trying it on someone else.
The materials for dental prosthetics are very specialized and can be purchased from dental supply companies as well as numerous makeup effects suppliers. A comprehensive list of suppliers is included in Appendix C at the back of this book.

 |
 |
We placed our discussion of casting teeth before casting the face because if dental prosthetics are required as part of the character makeup, they must be completed before a face lifecast can be made so that your subject can be wearing them during the lifecasting. If they are not worn during the lifecast, the appliance will not fit correctly when the teeth are in place and the prosthetic is applied.
Before you begin, determine the size of the dental trays you will need to use for the impressions. Dental trays come in different sizes: small, medium, and large. Try each to find the correct one for your subject. Next, place a cape or some sort of covering around your subject to avoid getting your subject’s clothing messy.
The dental alginate that I use is Algitec® dustless alginate impression material by Patterson Dental Company of St. Paul, Minnesota. There are a number of dental alginates you can use. Follow these steps:
1. Wear gloves when casting an actor’s teeth; it’s a good idea hygienically, and it’s simply better for your subject’s confidence in you.
2. Brush a very light layer of petroleum jelly over the front of your model’s teeth.
3. Begin by mixing a small amount of alginate with water. The alginate comes with specific instructions; as you use the alginate and become comfortable with it, you will be able to mix it by eye and by feel.
4. Mix for about 45 seconds or until the alginate becomes a thick paste. Then use a craft stick or small spatula to spread it into the upper plate tray. Mix the alginate thick so it won’t run down your subject’s throat; this will also help obtain a better gum impression.
Fill the tray completely; if it overflows, scoop the alginate back into the tray. You will have only about 2 minutes total working time before the alginate sets fully.

 Your water temperature should be about 72oF (22o C). Cold water retards the set and warm water accelerates it.
It may be advisable to invest in an infrared digital thermometer, too. It will come in handy for many tasks. Radio Shack® sells one for about $75 (£40) that I have found invaluable. It’s a very handy little gadget I learned about from Dave Parvin—just one of many tips I have received from a truly amazing artist and a good friend.
I’m sure you can find something similar elsewhere for less money.
I just happen to be a Radio Shack junkie.
Next, do the following:
5. Once the (thick) alginate is in the tray, run the tray under water for a moment if it’s handy and form the alginate into a tray-like shape.
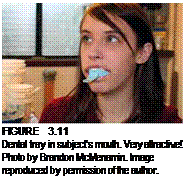
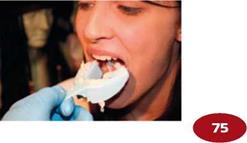
6. Open your subject’s mouth wide and press the tray gently into position; then dose the subject’s mouth. Carefully pull the upper lip over the tray if possible.
7. You may ask your subject to lean slightly forward in case the alginate isn’t quite thick enough; this will help prevent alginate slipping toward the back of the throat.
This process can be somewhat messy, so it’s a good idea to have your subject’s head tilted slightly down. This will prevent runny alginate from running down the throat, and many people tend to collect a lot of saliva in their mouth during this process, creating rather excessive drool! Did I mention how much fun this is? Don’t be in a hurry. Keep the mouth closed, and don’t move the tray. Hold it steady until the alginate is fully set.
Now do the following:
8. When the alginate has set, have your subject flex her lips. Ask the subject to close her lips around the tray and blow. This will introduce air between the set alginate and the teeth, making removal much easier. Have a paper towel or napkin ready for your subject to remove any residual alginate that may still be in her mouth or to wipe away saliva. Because the solidified alginate is mostly water, it is soft and rubbery and will begin to dry out quickly. You can wrap it in wet paper towels or submerge it in water to prevent shrinkage while you mix the dental stone or while you prepare to cast the lower teeth. This step is necessary only if you are going to take an impression of the lower teeth before casting the upper teeth and the alginate will be setting for a while.
9. 
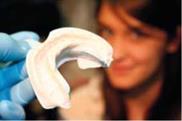
Casting the lower teeth follows the same procedure as the upper teeth, but you must be sure to mix the alginate properly and thick because the lower tray must be upside down when it goes into the subject’s mouth; you do not want the alginate to run out of the tray after you’ve filled it.
10. 

![]()
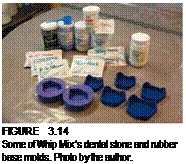
Once you’ve got both upper and lower impressions made, it’s time to make positives. You can use either dental stone or Ultracal 30. There are numerous types of dental stone available from different manufacturers. Whip Mix Corporation, one of the manufacturers whose products I use, has 22 different gypsum dental stone materials available at this writing.
11. Dental supply companies sell rubber base molds you can use to cast a nice, professional-looking stone base for your teeth to sit on, or you can make one yourself by shaping some oil clay and make a silicone mold of it. You will need this after the next step.
12. Mix enough dental stone to fill your tooth tray; with a small brush, begin to apply the stone to the alginate negative. Shake it a bit to get any small bubbles to rise. You will notice that the stone liquefies as it is shaken. This gentle shaking also helps ensure that the Ultracal 30 (let’s just call it Ultracal from here on) makes its way completely into each tooth cavity. When all the tooth spaces are filled, build up the Ultracal slightly higher than the edge of the dental plate and let it sit for about an hour before demolding it.
If you want to make the Ultracal stronger, mix 50 percent acrylic fortifier (or Acryl® 60) and 50 percent water when you mix the Ultracal. You can buy cement acrylic fortifier at just any hardware store, especially the Big Box stores like Lowe’s or The Home Depot. Acryl® 60 can also be purchased at most Ace Hardware, True Value, or Home Depot locations. In addition, if you cover your Ultracal cast with plastic before it sets, the plastic will help the Ultracal retain moisture as the heat builds up when it cures, making the stone stronger still. At least that’s what I’ve been told; I have no way of proving or disproving it.
Now:
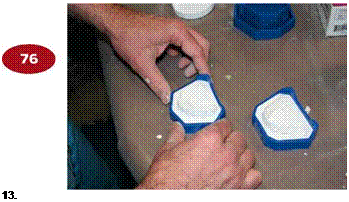
Remove your stone cast from the alginate and dental tray. Clean up any rough edges around your cast, and remove or patch any blemishes that are present. Mix another small batch of Ultracal, enough to fill the rubber base mold. Make it thick so that the teeth will not sink.
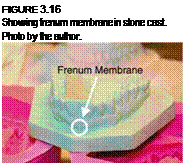
14. Gently tap the mold to get rid of any air bubbles or air pockets trapped inside the mold. As the Ultracal begins to set, carefully place the teeth into the wet Ultracal (with the teeth facing up, of course), being careful to leave the gum and fre – num membrane visible. The frenum membrane is the thin flap of tissue that connects the upper gum to the upper lip. You can feel yours with your tongue. It important to keep this flap visible on your cast so you have a gauge of how far you can sculpt your teeth appliance later.
![]()
15. After you have done this for both the upper and lower teeth, make a silicone mold of them so that you can make duplicate positives of the upper and lower teeth. This is not essential to do, but it can be very useful for at least two reasons: You will have a clean reference model to refer to when sculpting your appliance, and if you somehow manage to break one of your positives, you won’t have to start from scratch again by taking new impressions; you will already have a mold and can simply mix more stone and fill it.
16. There are a variety of silicones that you can use for this step. The procedure is the same regardless of the silicone you choose. I like to use Smooth-On’s Mold Max® 30, a tin-cure (also called a condensation-cure) silicone simply because I’m most familiar with it, although Silicones, Inc’s GI-1000 and Polytek’s TinSil Gel-10 are very easy to work with and they can all be accelerated to kick, or set up, quickly.
We will get into a much more detailed discussion of silicone in Chapters 5 and 6, but for now there are two basic cure types of silicone used in makeup effects: condensation cure and addition cure. They are very different, and they are not intermixable. There are two types of condensation-cure silicones: one – part and two-part. We will concern ourselves primarily with the two-part condensation silicone, which uses tin in the curing process and is also called tin-cure silicone.
Condensation silicone needs both air and moisture in the air to cure; it will not cure in a vacuum. There is a negligible amount of shrinkage with this type of silicone. Addition-cure silicone uses platinum in the curing process and is often called platinum-cure silicone. Addition silicone cures by a self-contained chemical reaction, which means it can cure in a vacuum, if necessary, and there is virtually no shrinkage whatever. Platinum silicones cure faster, as a rule, than tin silicones which, if not accelerated, can take as long as 18 to 24 hours to fully cure. The more platinum the silicone contains, the faster it will kick. That’s another reason to use it in this step (if you do this step). However, platinum is not cheap.
 |
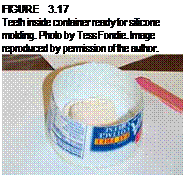 of the container.
18. Mix silicone to pour over the teeth. Do you still remember your geometry from high school? To find the volume of a cylinder, which we’re using here, V= nr2h. Translated, that’s Volume = 3.142 x radius2 x height, where the radius of a circle is half the diameter (or width of a circle), which is the distance from outer edge to outer edge through the center. The volume of silicone you’ll need to mix is that
![]()
number minus the displacement of the teeth cast. If that seems like too much work, it’s actually pretty easy to eyeball it. The thing to keep in mind here is not to be wasteful of silicone. It’s your money. Or your client’s.
19. Using either a triple-beam scale or an accurate digital scale, measure your silicone according to the manufacturer’s recommendations and mix the components thoroughly. It’s better to mix too little than too much if you’re eyeballing it. Silicone sticks to silicone, so if you make your batch too small, mix up some more and pour it onto what you’ve already poured once it is firm; it doesn’t have to be set. If you use Smooth-On Mold Max® 30, you can decrease the kick time by using FastCat® 30 instead of its regular catalyst. By increasing the amount you use in proportion to the rubber base, you can decrease the kick time to minutes and can usually demold in less than an hour.
However, accelerating the silicone like this significantly weakens it to the point that it may become brittle within days. You can use a fast-setting platinum silicone and demold in a very short time. Adding heat will also accelerate platinum silicone curing; it will also affect tin-cure silicone, but not as much. However, more air bubbles are more likely to escape and not cause problems if you let the silicone cure overnight.
Now:
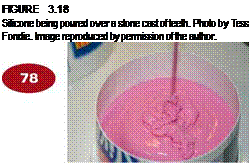
20. Pour the thoroughly mixed silicone over the teeth, making sure that the silicone rises above the uppermost teeth by at least % of an inch (about 6 mm). When the silicone is completely cured it will feel like hard rubber. Demold the teeth and lightly brush a very thin layer of petroleum jelly inside the molds as a release agent. You shouldn’t really need it, but this will ensure that your next stone cast will pop out easily.
21. Mix another batch of Ultracal or dental stone and fill the molds. When they’re filled, tap the molds to release any trapped air bubbles and make them rise to the surface. You can demold the teeth in about an hour. Remember that you can use a 50/50 mix of water and acrylic fortifier and cover the molds with plastic to get a stronger stone cast when using Ultracal. Once the teeth are demolded, you’re ready to begin sculpting the teeth your character will need for the makeup.
