Stone molds, also called gypsum molds, are organic molds made with a base material of hydrated calcium sulfate, used for making Plaster of Paris, cement, Hydrocal, and Ultracal, among others. Gypsum has quite a few varied uses, from making drywall and fertilizer to being a major source of dietary calcium and also an ingredient in Hostess® Twinkies®! White Sands National Monument in New Mexico is a 275-square-mile expanse of white gypsum sand. Well, enough history; it’s time to make your mold.
This process is exactly the same as when you made your Ultracal positive in Chapter 3 after taking your subject’s lifecast, only this time we’re making a negative, not a positive.
1. Spray the sculpture with a layer of Kryolan® Crystal Clear and let it dry. Then spray a layer of Dulling Spray to give the Ultracal a surface to adhere to.
2. Mix enough Ultracal to create a %-inch thickness that is the consistency of a thin milkshake—loose enough to brush easily with a 1- or 2-inch chip brush.
3. Begin brushing the Ultracal onto the sculpture, making sure to get Ultracal into all curves and creases such as the nose and the ears. Brush in all directions. This will help eliminate any trapped air bubbles.
4. As the Ultracal begins to thicken, dribble and brush more onto the sculpture until you have built up a thickness of about % inch.
|
![]()
5. When your detail layer has gone through the heating phase of its cure, mix up some new Ultracal. You will add pieces of burlap fabric as you apply the next batch of Ultracal, building up a thickness of three or four layers of burlap. Thoroughly press each piece down to remove trapped air and then overlap each piece of burlap by at least 1 inch.
6. 
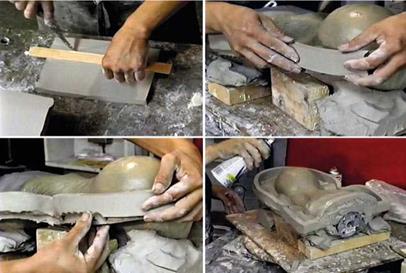
After the burlap layers have cured, add a final beauty layer of just Ultracal that will give your mold an overall thickness of about 1 inch. Artist Pedro Valdez, who is shown at work in these photos, usually leaves a textured finish rather than a smooth finish so that the mold won’t slip accidentally.
Some folks prefer to use hemp fibers or fiberglass mat fibers instead of burlap fabric as the reinforcing material they put in the Ultracal. It is nothing more than a personal preference and whether the materials are available in your area. For me, burlap and fiberglass mat are a 3-minute ride to Home Depot, but I have to order hemp online. You’ll find a list of suppliers in the appendix at the back of this book, so let’s continue.
![]()
7.  When this half of the mold has fully cured and is cooling down, you might begin to remove the clay wall from around the sculpture.
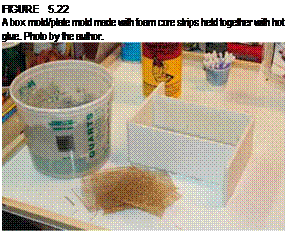
8. Next, carefully remove the 2 x 4s and 1 x 2s or the foam core; if you’ve used foam core and hot glue, spray the glue with cyanoacrylate (Superglue) activator/accelerator. It will soften the glue so that it’s easier to remove. Next remove the clay base that was being supported. If your sculpture has delicate parts such as ears, be very careful when removing the clay so that you don’t damage it.
9.  Once the clay is removed, you can use coarse sandpaper or a rasp to remove sharp edges and smooth the edges of the mold, removing excess Ultracal.
10. When you’ve done this and cleaned away the clay you’ve already used, carefully turn the mold over, supporting it under the edges of the mold flange (the part sticking out perpendicular to the sculpture) with the wood and some of the clay you used on the other side.
11. Spray this side of the mold with Crystal Clear and Dulling Spray and then lightly brush any exposed Ultracal with a thin layer of petroleum jelly. Brush about an inch or two down the side just to be safe.
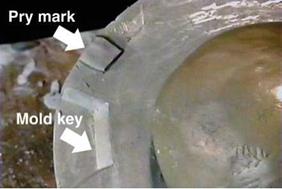
12. Add small pieces of clay about 12 inches apart all the way around the mold; line them up opposite one another if you can. These will be used as pry holes to aid you in getting the two mold halves apart. You might also want to draw a mark with a Sharpie below the pry mark on the mold in case any Ultracal accidentally covers it. It will be easier to find later.
 figure 5.21
Build a 1-inch retaining wall around the flange of the stone mold. Images reproduced by permission of Mark Alfrey.
![]()
13.  Now cut a slab of clay about 1 inch thick and trim the edges smooth. Use a paint stick to measure a width of about 1% inches and cut the slab into strips. Begin placing the clay strips around the perimeter of the mold, and press it down onto the Ultracal so that it will hold.
14. When you’ve finished, spray another coat of Crystal Clear so that the clay gets coated and spray a layer of Dulling Spray.
15. Now repeat steps 1-4 for the back side of your mold. You will eventually begin to know how much Ultracal to use for certain projects, but it’s easy enough to mix up a little more if you find you haven’t mixed enough. Unlike plaster, Ultracal has a substantial working time—hence its name, Ultracal 30.
16. Just as with the positive you made in Chapter 3, you might choose to cover the Ultracal with a plastic bag to hold in moisture as the
stone heats. It is supposed to make the stone stronger; I don’t know if anyone’s actually run tests, but I tend to see the glass as half full. It won’t weaken your mold, and it doesn’t add to the cure time. It will, however, mean that there is moisture in your mold, and if you’re planning to run foam latex in it soon, you’ll need to get rid of all that water or risk ruining your latex appliances. More about that in the next chapter.

