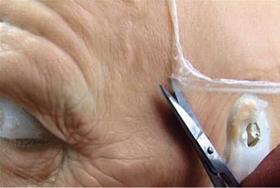
The term for cleaning up seam flashing and surface blemishes is seaming. The process actually deseams the prosthetic.
Silicone
Starting with a small pair of sharp, fine scissors and your fingers (careful!)
 or a good set of tweezers, carefully lift the seam flashing and trim as close to the surface as possible.
Neill Gorton suggests that rather than simply trimming the flashing to the surface, which often still leaves a detectible remnant, cut a very slight channel along the seam. It is much easier to fill a small channel than to mask small bumps that could be left behind by simply trimming the seam close. These channels and indentations can be patched invisibly with small amounts of the same mixture of silicone used to cast the appliance initially.
After the flashing and other blemishes have been cut away, very carefully clean the surface of the prosthetic with a little isopropyl alcohol or acetone to remove fingerprints, dirt, dust, powder, mold release residue, or whatever. If the piece has been handled, you need to give it a good, gentle cleaning so that the silicone patch will grab and stick properly. Be careful to avoid appliance edges.
Using a small, accurate digital scale, mix a small amount of the silicone in the same proportion used for the appliance. Then, working in only small areas at a time on the seam—no more than 3 inches (about 7.5cm)—it will be easier but somewhat dependent on the silicone you use. Using a platinum-cure silicone such as Polytek’s PlatSil Gel-10 will allow you to work quickly. The following steps will work best if your appliance is resting on either a soft foam or rigid foam form of your model.
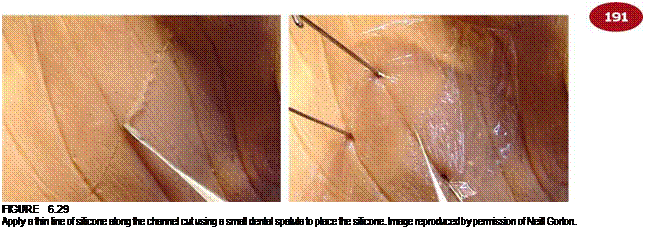
1. Apply a thin line of silicone along the channel cut using a small dental spatula to place the silicone.
2.
 |
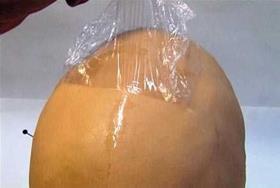
Then place a piece of clear plastic wrap (cling film) over the patch and lay it down carefully to make sure there are no trapped air bubbles. It is best if you can pin it taut in place. If the patch is on the neck, you can use tools to match and follow existing wrinkles and so on. A hair dryer will also accelerate the silicone cure.
figure 6.30
If the patch is on the neck, you can use tools to match and follow existing wrinkles. Image reproduced by permission of Neill Gorton
3. As the silicone begins to thicken and set up, indentations can be added on top of the plastic wrap. After the silicone is fully cured, the plastic wrap can be carefully peeled away (nothing sticks to silicone, remember?), leaving an invisible patch where there was a noticeable seam before. Voila! Perfect.
![]()

![]()

 FOAM LATEX
Seaming and patching foam latex can be a real pain in the caboose if you actually try to seam and patch with foam latex, because it requires a heat cure again. Unfortunately, foam latex is probably the best material to use because it will be the same as the rest of the appliance. However, in many cases seams are in areas of the appliance where you may be able to get away with using a different material that doesn’t move in the same manner as the foam. It probably won’t really be enough for anyone to notice but you.
Pros-Aide® makes a terrific patching material, and there are two ways to use it. First, you can pour a small amount into a small cup and let it sit exposed to the air for a while; as the water evaporates from the adhesive, it will thicken up and you can then fill the seam or blemish. As the Pros-Aide® begins to dry, you can texture it carefully with a tool or a (damp) stipple sponge. When it is dry (it will be completely clear when dry), powder it, and you’re good to go. You can also add a small amount of Cab-O-Sil® to fresh Pros-Aide® to thicken it into a paste and apply in the same manner. Pros-Aide mixed with Cab-O-Sil® is affectionately called bondo after the car body filler Bondo.® Oddly enough, the Pros-Aide® will still dry clear, even though the Cab-O-Sil® is white (unless you’ve added a lot of the filler). A fine brush dipped in 99 percent IPA (isopropyl alcohol) can be used to feather the edges to nothing while the Pros-Aide® is still soft.
You could even try a bit of melted gelatin as a seaming and patching material on foam latex, provided you don’t apply it when the gelatin is too liquidy and seeps into the foam. A fine brush dipped in hot water can be used to smooth the gelatin. Texture the same way as the Pros-Aide;® freshly set gelatin is very sticky until it is powdered, so a light dusting of powder may facilitate texturing if the appliance needs it.
GELATiN AND COLD FOAM
If your appliance is made of gelatin, I do not recommend using gelatin as the seaming material. The reason should be pretty obvious: You must melt gelatin to apply it to a seam, and melted gelatin is hot—warm, at least—and gelatin melts when it gets too warm or wet; hence, you don’t want to remelt the appliance you’ve just spent considerable time and effort to make. Use Pros-Aide® instead. Pros-Aide® (bondo) is also the preferred method of seaming cold foam (urethane foam).
