Hand-laid hair is difficult to match on a daily basis and takes considerably longer to do than applying a lace piece. For that reason it is not often used in many screen productions. Hand-laid hair is still used fairly extensively in some cir- cles—theater and low budget shows—though it does appear to be lessening. It’s not hard to do, but it is time consuming, and lest it becomes a lost art, I’m going to do my part to describe how to do it. Paul Thompson of the Makeup Designory does a terrific job describing and showing the process step by step in his book, Character Make-up, and so does master wigmaker Patsy Baker in her book, Wigs & Make-up for Theatre, Television, and Film.
I’ve had mixed results (more bad than good, really) laying on real hair vs. crepe wool. The problem with real hair is threefold: Crimping it is critical because facial hair does not grow straight; real hair is expensive, far more

 expensive than crepe wool; and real hair is not particularly fond of any kind of adhesive. Facial hair is not usually straight, either, and real hair would need to be kinked rather substantially to be believable.

![]()
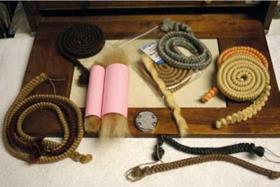
Crepe wool is ordinarily sold by the yard, but at most places you can buy it in whatever length you want; they’ll just cut it to order. The wool is braided, so when it is straightened it will almost double in length. To hand-lay hair, you’ll need the following stuff:
■ Adhesive
■ Various colors of crepe wool
■ Scissors
■ Drawing mats
■ Hackle
■ Rattail comb
■ Adhesive remover
■ Setting powder
There are a few ways to straighten the crepe before you lay it on the face. It can be dampened slightly and ironed (on the wool steam setting) or held in front of a clothes steamer or even a boiling tea kettle. Either of the last two options comes with this caveat: Watch your fingers! I’ve found that placing a section of the crepe wool into a bowl of water and microwaving it for a minute or so will
take the curl right out of it. Then the wool needs to be dried before it can be separated. The straighter the crepe wool, the easier it is to work with, but completely straight facial hair doesn’t look realistic when applied to the face, the exception being Asian facial hair, which is often quite straight. For a character makeup of African ancestry, you might want to forego straightening the crepe at all, since the facial hair tends to be quite curly.
PREPARATION
1. Unravel some crepe wool from the braid, but be careful not to pull too far and tangle the hair and strings. Cut away the string from the braid.
2. The goal is to remove most of the curl from the crepe hair, but not all; keep about 30-40 percent of the curl.
3. Put the cut length of hair in a microwave-safe bowl of water and nuke it for about a minute; keep an eye on it to make sure you don’t lose too much curl.
4. If you are going to mix hair to get a specific color, repeat step 3 for each color you intend to mix.
5. When the hair is dry (you can pat it almost completely dry in a towel), pull the straightened braid of crepe hair apart by gently pulling one end while holding the other end. You could use a wide-toothed comb, but that tends to waste a lot of hair.
6. As you pull, the hair should separate into 6-8-inch lengths (15-20 cm). Now is when you should mix in other colors if necessary.
7. Pull several strands of each color and put them together until you have a pile of hairs the color you want. From here, continue to pull the hair apart, put it back into a bundle, and repeat until you have a bundle of crepe hair that looks fluffy and even. If you are not going to use the hair right away or if you have more than you will need immediately, you can wrap any excess hair in a paper towel, tape the roll, and put it in a plastic zipper bag.
8. The next step, if you have one, is to run the hair through a hackle.
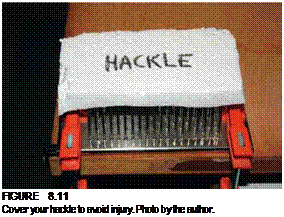
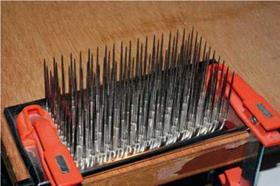 If you’ve never used one before, get some Band-Aids ® and antiseptic and keep HIGh, R58pJC! h th them close. A hair hackle looks like a small medieval torture device but is actu – author30 Є’ 00 ye ally used to detangle hair. When it’s not in use, a cover should be placed over the hackle pins to prevent accidental impalement. I put a big chunk of Styrofoam over mine.
9. Clamp or tape the hackle to the edge of a table or other work surface. Slowly and carefully place a small amount of hair about 1 inch (2.5 cm) into the hackle.
Hold the hair firmly and pull it toward you through the pins. Repeat this process a few times, adding an inch or so more hair as you pull it through the hackle.
![]()
10. 

 Now repeat this process with the other end of the bunch of hair you just pulled through the hackle.
11. Do this with all the hair you will be laying on. As hair is pulled through the hackle, short hairs and tangled wads of hair will build up in the pins. When the buildup of crud hair begins to interfere with your hackling, carefully remove the hair buildup and set it aside. You can pull and separate that hair later to put through the hackle again.
12. Cutting or trimming the crepe hair before laying it on is critical to a good application, as is
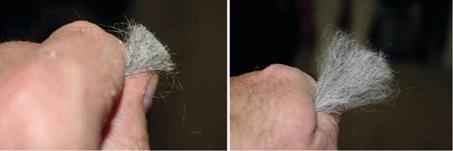
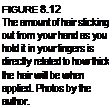
how and where you hold the hair. The amount of hair sticking out from your hand as you hold it in your fingers is directly related to how thick the hair will be when applied. The more the hair is sticking out, the thinner the application (note how the hair fans out, away from your fingers).
|
|
The closer the end of the hair is to your fingers, the thicker it will be. Be careful, because with facial hair, there should be a little daylight visible between the hairs, not an impenetrable carpet. Hair will be thickest under the chin and getting thinner as you go toward the side edges on the cheeks, where the hair will be the thinnest.
13. The hair ends should be cut at an angle that will mimic the direction the hair should be growing in. Be careful when cutting so clippings will not fall into the hair and get caught.
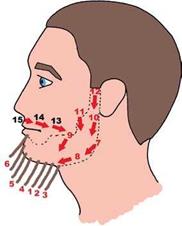
When laying on hair by hand, the idea is to work in sections, with the hair furthest back and underneath being applied first and the foremost or top-most hair being laid on last. With that in mind, you need a plan. The hair can’t simply go on. For a full beard and moustache application, the hair will be applied in 15 or 16 sections.
APPLiCATiON
Hand-laying hair is not a particularly difficult skill to master, relative to some other aspects of special makeup effects, but it does
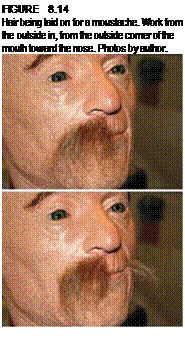
take repetition to become good at it. And this is definitely a skill to be good at. I mentioned before that hand-laying hair is becoming a lost art, but there’s no reason that it should disappear. It’s your makeup that the hair is going to be part of, so you should be the one putting the hair on. Enough said. It’s time to apply the hair:
1. Do a position test before applying adhesive by holding the hair up to your subject’s face, under the chin, because under the chin will be the first section to fill.
2. The hair under the chin should appear to grow somewhat forward, so the hair ends should be cut to make sure the application of the hair will be in the right direction.
Don’t use too much hair, and you want the hair to stand on end, with only the ends of the hair stuck into the adhesive.
Now that you know where adhesive will go first, mix some Telesis ® 5 (thinned 1:1 with Telesis ® Thinner) or Pros-Aide®. Your choice; crepe hair will adhere well with either of these adhesives. Just remember that Pros-Aide ® needs to dry (clear) before you apply the hair.
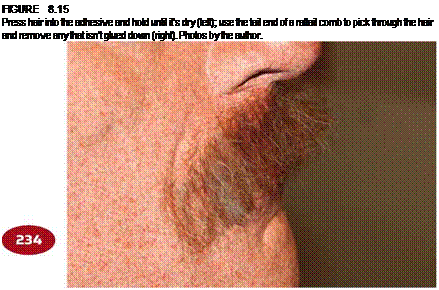
3. Once you’ve applied the adhesive, gently press the ends of the crepe hair into it and hold until it’s dry. Telesis dries pretty quickly—even more quickly when it’s thinned. If necessary you can use the back of an applicator swab to press the hair into the adhesive.
4. When the adhesive is completely dry, use the tail end of a rattail comb to pick through the hair and remove any hair that isn’t glued down. There will be some. The resulting hair glued in this section should be pretty thin.
5. The next section will go right in front of the last one. Comb through it and hold it the way you held the last bunch of hair. Combing will make sure the hairs are going in the right direction and will also remove any small, extraneous hairs.
6. Apply adhesive to the next area, being careful not to get adhesive in the first section of hair. Press the hair into the adhesive and hold until it’s dry. Make sure the hairs look like they’re growing out of the skin and not just lying on the surface.
7. When the adhesive is dry, pick or comb gently through the hair to remove loose ones.
8. Continue this process through each section, back to front, bottom to top, until all the hair has been applied.

 |
Once the hair has all been laid on, it must be neatly trimmed into a normal beard. Begin with the moustache and trim the hair back to the edge of the upper lip. Then trim the hair over the corners of the mouth in a downward direction (cutting away from the nose) with the scissors almost parallel to the skin. Continue to trim, forming the shape of the beard along the edges; use a comb to lift sections of hair and continue to keep the scissors parallel to the skin beneath the hair you’re cutting to avoid lopping off too much hair. When you’ve finished trimming and shaping the beard and moustache, use a pair of tweezers to pick off stray bits of hair from the beard and from the skin.
If you have a lifecast of your actor’s face, it is possible to create a hand-laid beard that can be used multiple times. In the same way that you would create a bald cap from scratch on a plastic bald cap form, you can build up latex on your subject’s lifecast, too, provided that it has been sealed to make removal of the latex easy.
1. With a pencil, draw a pencil line for the outline of the beard and moustache.
2. With a small piece of sponge, stipple a thin layer of latex over the beard/ moustache area. When the first layer is dry, repeat, building up as many as three layers of latex to provide a good base.
3. When you are ready to apply the hair, stipple another layer of latex over the first section, then immediately press the hair ends into the latex. Just as with the Telesis, hold the hair still until the latex is dry, then carefully pick out loose hairs.
4. Repeat for the next section, and the next, and the next until you’ve created the new piece, picking out loose hairs before moving on to each new section of hair.
5.
Trim the beard as before and you’re ready to remove the new piece from the lifecast.
6. Powder the exposed edge and carefully lift off the beard, powdering the back so that the latex doesn’t stick to itself. If you need to trim the latex, try to keep the blending edge as thin as possible. When you glue the hair appliance onto your subject’s face, you might find it necessary to add thin hairs along the top edge of the moustache and beard to help conceal the edge. The bottom edge under the chin and upper lip should not be visible.
To remove the hand-laid beard and moustache, use the appropriate adhesive remover, being careful not to get any in your subject’s mouth, and work in small sections just as you did to apply the hair. Brush on a small amount of remover along the top edge of the beard or moustache and, as the solvent loosens the adhesive, gently pull the hair off and continue. When all the hair has been removed, cleanse the skin and apply a moisturizer to the skin.
Eyebrows can also be hand-laid using crepe hair—or yak hair, or human hair, but again, if you are going to use human hair for eyebrows, I think the best way is to ventilate the real hair into fronting lace. One method for applying crepe eyebrows is to attach the crepe to the skin just above the natural eyebrows and comb the crepe down into the natural hair, or glue the crepe directly onto the natural brows. However, you might find it necessary to completely cover the natural eyebrows. The consideration here is, will the eyebrows have to match up over several shooting days? In addition, how long will it take to do it every time? If speed and repetition are the order of the day, then by all means, ventilated eyebrows are the way to go. It still might be necessary to block to the original eyebrows, however. This is all essentially moot, of course, if your subject is wearing prosthetics in which eyebrows become part of the makeup. The eyebrows will most likely be ventilated pieces or punched—or not.
Let’s move on.
Blocking eyebrows with Telesis® 5: Telesis ® 5
is great for gluing hair down flat. Brush a tiny bit of full-strength
Telesis ® 5 into your subject’s eyebrows, pressing the hair down flat as
you brush. Full-strength adhesive is not as runny as thinned adhesive, but still, be
careful so none drips near your subject’s eyes. When the glue is dry, powder and apply
a skin-safe silicone such as Alcone’s 3rd Degree, Smooth-On’s Skin Tite ®, or Mould Life’s
Sculpt Gel. Silicone can be smoothed with 99 percent alcohol while the silicone is still
uncured; once the silicone has begun to kick—that is, while it is still soft but has begun
to form a skin—a small piece of plastic wrap can be laid on top of the silicone
and the edges pressed smooth and invisible. once the silicone has
fully cured, the plastic wrap can be carefully removed
and the edges will be seamless.
![]()

