The process of casting dental appliances can be rather complicated and time consuming, considering how small they can be, but considering how important our mouths and teeth are, it is important to take great care to do this task well.
 Sculpting and casting dental appliances is fun, but be prepared for disappointment. This job is not easy and takes much practice to become proficient; unless you are called on to do this regularly, dentures might be an aspect of makeup effects that you’ll want to leave to a specialist.
1. Place your dental positive in water and then brush it with a coat of Al-Cote® dental separator. When the first coat is dry, add a second coat. You might also opt for a thin layer of petroleum jelly instead of or in addition to the Al-Cote.®
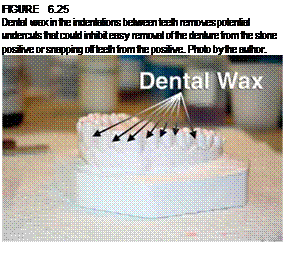
2. Put some dental wax in the indentations between the teeth. This is fairly easy to do, but the wax must be melted; you can also use wax or oil clay instead of dental wax. This will prevent the dental acrylic from filling that space and risk breaking the stone when you remove the acrylic cast from the positive.
3. Mix a 50/50 batch of tooth shade acrylic with Flexacryl with monomer and slowly pour it into the mold when it starts to thicken, tilting it back and forth to make sure the material gets into all the cavities of the mold.
4. Press the positive into the mold, but don’t press so hard that suction is created when you remove your hand; you don’t want to suck air into the mold with the acrylic.
![]()
5. 
![]()
![]() Now you can do one of two things: You can place the mold in a bowl of hot water to cure the acrylic (it must be large enough to submerge the entire mold), or you can submerge the mold in a pressure chamber; Harbor Freight and Northern Tool & Equipment sell a 2%-gallon paint tank that is perfectly suitable for this task. You need to have an air compressor that is capable of delivering 30psi of pressure, which isn’t much. This will cause the acrylic to cure faster, denser, and with fewer surface flaws. You can demold after about 20 minutes.
Now you can do one of two things: You can place the mold in a bowl of hot water to cure the acrylic (it must be large enough to submerge the entire mold), or you can submerge the mold in a pressure chamber; Harbor Freight and Northern Tool & Equipment sell a 2%-gallon paint tank that is perfectly suitable for this task. You need to have an air compressor that is capable of delivering 30psi of pressure, which isn’t much. This will cause the acrylic to cure faster, denser, and with fewer surface flaws. You can demold after about 20 minutes.
6. Remove from the appliance any excess acrylic that will prevent extra thickness in the finished appliance, which you don’t want.
Now, here is where I would ordinarily be done with casting dentures. All that remains is to trim away any acrylic that might be causing pressure or discomfort, paint them with Minute Stain, wash them, and wear them. What follows is more advanced, and I strongly suggest that you practice quite a bit before attempting this task for a paid gig. These next steps (7 through 23) border on the realm of a professional dental technician. I’m providing this information as information only and do not advocate its use.
7. Draw lines on the teeth and gums with a mechanical pencil to show where the incisal layer is; this is a translucent outer layer on all teeth. Use the Dremel® to carefully grind off some of the acrylic, leaving a thin layer around the teeth at the gums and at the base of the teeth in a somewhat jagged pattern. You will be recasting the teeth with clear dental acrylic, thereby adding a sense of depth.
Remove the pencil markings with a Q-tip® dipped in monomer.
Brush Al-cote® over any exposed stone on the positive before casting the incisal acrylic to ensure that it won’t bond to it.
Mix 1 oz. of clear acrylic with 1 tsp. of tooth shade acrylic with monomer—enough to liquefy the powder; when it begins to thicken slightly, pour it into the mold and press the positive back into the mold. You can repeat step 5 now. After the teeth have been demolded, they need to be prepped for casting the gums. Take the mechanical pencil again and draw around the teeth at the gum line. Then take the Dremel® and remove as much of the existing acrylic covering the gums as you can, leaving a thin layer only. Then remove any remaining pencil markings with another Q-tip® dipped in monomer.
