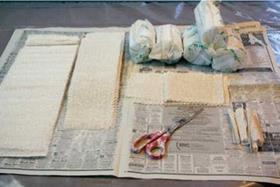
Face and neck lifecasts are probably the most common for creating makeup effects, since most makeups can be achieved with small appliances rather than full head and shoulder appliances. I’m sure there artists who would disagree, but face and neck lifecasts are certainly what I do more of. Here’s how to do it and what you’ll need to accomplish the task:
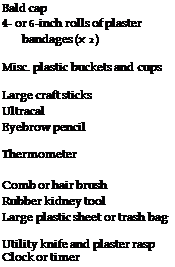 Alginate
Scissors to cut plaster bandages and burlap and trim bald cap Pitcher of warm water Spirit gum or Pros-Aide® adhesive. Spirit gum remover or Pros-Aide® remover (Ben Nye® Bond Off! works well) Latex, vinyl, or nitrile gloves 1-inch chip brushes
Cholesterol conditioner, petroleum jelly, KY® Jelly
%-inch (12 mm) metal electrical conduit (about 7 inches long)
WED clay or (sulphur-free) oil clay Cotton or cheesecloth (cut in short pieces) Loosely woven burlap (cut into 4 x 4-inch and 3 x 6-inch pieces)
Drill with Jiffy-Mixer®
1-, 2-, and 5-gallon plastic buckets Masking, gaffers, or duct tape
It will be advantageous for you to arrange everything you will need ahead of time so that you will be able to reach it easily and work in an efficient and timely manner once you begin. It is worth noting again that there is no single way to approach lifecasting a face and neck. If you were to poll 50 artists about the way they do a lifecast, you are likely to get 25 different methods or more. I learned one way but have altered my methods several times over the years. I will probably continue to do so as materials change and advance. The description that follows is a process that works well for me, but once you’ve become comfortable with the process you are likely to come up with your own way to approach it.
![]()
several thin strips that will be used to reinforce the nose along the bridge and septum. Premeasure the alginate you will be using into a plastic container. Also premeasure the amount of water you will need into one of your larger plastic containers. You might want to use the 1 – gallon bucket even though we’re not mixing a large batch of alginate, because the Jiffy-Mixer® is likely to cause some splatter. To minimize it even further, set the 1-gallon bucket in the 5-gallon bucket before firing up the jiffy mixer. The water temperature should be about 80oF (about 27o C).
You can certainly use cooler water or warmer water. The 80oF (about 27o C) water temperature is comfortable for most people. Cooler water will cause the alginate to set more slowly; warmer water will accelerate the set time. Refer to the recommendations of the particular alginate you are using, because they could differ somewhat as to the ratio of alginate to water. With most alginates, a ratio of 5 oz. of alginate per 1 lb. of water will give you a nonrunny, workable mixture that spreads easily and stays where you put it. I strongly suggest a bit of self-experimentation before you begin putting alginate on your subject’s face.
You might also want to do a pH test on your water supply. Most tap water will be just fine for mixing alginate, but some city water supplies contain chemicals that will interfere with the way alginate sets, causing partial or complete cure inhibition. It’s rare, but it does happen. If you are in any doubt, use distilled water from your local grocer. Alginate also has a lifespan, and old alginate or alginate that has not been stored properly will also lose its ability to set up. It never hurts to do a test if it’s been a while since you’ve used your materials.

![]()
For our purposes, we will be using EnvironMolds’ FiberGel.® FiberGel® has a set time of 4-5 minutes (which means we will need to work quickly) and contains a matrix of tiny fibers. The fibers not only add tear resistance and strength to the alginate, they help prevent running and dripping. The fiber matrix also allows the alginate to retain moisture, thereby reducing the shrink rate and keeping your mold soft and flexible far beyond the usable time of most other alginates. This allows for delayed casting times without the loss of detail if necessary. This was one of Dave Parvin’s many innovations.
We will be casting our subject seated in an upright position. I’ve heard that some artists like to cast a face with the subject lying flat. I’ve never met anyone who does it that way unless the final result requires a character to be lying flat. Lying down could be quite comfortable for the subject, but when the subject is lying flat, gravity will pull the skin and muscles of the face downward in a way that can distort the lifecast as well as prevent the resulting appliance from fitting properly when the subject is standing or sitting upright.
3. Place your subject in a comfortable chair, preferably one that can be raised and lowered. Cover your subject’s body and clothing with plastic, carefully attaching it with tape at least an inch below the level of your cast.
4. Apply a bald cap to your subject. Applying bald caps properly is a necessary skill to get into the makeup guild, and we’ll talk about a full bald cap application elsewhere in this book. But for lifecasting, we need only apply the cap well enough to provide us with a good cast, keeping the subject’s hair out of the way. Begin by flattening your subject’s hair using water and a nonoily gel or hairspray. Aqua Net® hairspray works very well. Dampen the hair with water, then spray with Aqua Net and comb flat. Gently blow dry.

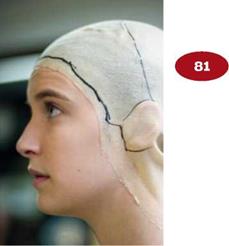 You don’t need to use an expensive bald cap—a regular theatrical cap will do, just make sure it’s large enough to cover your subject’s head. In a pinch, you can use plastic wrap tightly around your subject’s head, held in place with Scotch® tape. However, I am a firm believer that anything worth doing is worth doing well, so we’ll be using a bald cap made from scratch using slush latex built up in layers on a plastic head block. These can be purchased at a nominal cost and will definitely come in handy in your work. Carefully and comfortably place the bald cap snugly on your subject’s head, pulling it down to cover the ears.
5. Using the eyebrow pencil, lightly mark the cap around the subject’s ears, and draw a line across the top of the head from the middle of one ear to the other. If the ears do not need to be included as part of the life – cast, you won’t need to cut the cap to go around the ears. This will also prevent concerns of undercuts later in the process of creating your appliance.
6. Before gluing the cap down, you might want to trim the front closer to your subject’s hairline; otherwise, you can carefully pull back the front edge of the cap and apply adhesive to your subject’s forehead, then press the bald cap down onto the forehead. If you’re using Pros-Aide,® the glue dries sticky and transparently. Press the cap down until it holds. If you’re using spirit gum, wait until it is quite gummy before pressing the cap down.
7. Carefully start to secure the sides and back of the bald cap, making sure the cap is going to hold before moving on to the next section.
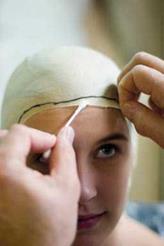
8. There should be no wrinkles on the head forward of the line drawn between the ears. If there are, carefully lift the cap at the edges and reposition it until the surface is smooth. Lasdy, mark your subject’s hairline with the eyebrow pencil. This line will transfer to the alginate and then to the Ultracal. This line is important because it shows exactly how far we can sculpt on the forehead and sides of the face without going into the hair.
9. Apply a small amount of cholesterol cream or petroleum jelly to your subject’s eyebrows, eyelashes, and any other facial hair. Use K-Y® Jelly or petroleum jelly to lightly cover the bald cap one inch beyond the line drawn across the top of your subject’s head. This will ensure that the alginate will not stick to the bald cap.
10. 
Before applying the alginate, explain to your subject what the procedure will entail and what the steps are going to be so that there will be


![]()
no surprises during the lifecasting. It is very important that your subject has no trouble breathing through both nostrils, because the mouth will be completely covered with alginate. Now would also be a good time to find out if your subject is claustrophobic. If that is the case, your approach to making the lifecast must be altered to do the cast in sections. Ideally you would know this kind of information beforehand so other arrangements could be made. Last-minute changes do happen, but the less you can leave until the last moment, the better.
Make any last-minute adjustments to your subject before you mix the alginate; make sure her head is aligned straight and not tilted, turned, or cocked at an angle and that she is sitting up straight. A misalignment can result in a lifecast that might look fine overall but that will be inadequate for sculpting a makeup appliance, because it will be distorted.
If your character will have dentures, now is the time for your subject to put them in so that the lifecast can be taken with false teeth in place. This will prevent the makeup from fitting incorrectly when it is applied later.
Now:
11. It’s time to mix the alginate. Look at the clock or start your timer when you begin to mix the water and the alginate powder so that you’ll know how much time you have before the alginate begins to set. To do a face and neck cast, we’ll need to mix 10 oz. of FiberGel alginate with 2 lbs. (32 oz.) of warm (80oF/27o C) water. Always add the alginate powder to the water and not vice versa. The alginate can be mixed with your hand, but I don’t recommend it; mixing with an electric drill and a Jiffy-Mixer bit is much faster and mixes the alginate and water more smoothly and thoroughly. Be careful not to start the drill too rapidly because you will likely put a cloud of alginate dust into the air! This is not good, particularly if the alginate you use has silica in it, as some do. If you are working with another person, divide the labor so that one person is spreading the alginate and the other is keeping an eye on the subject’s nostrils, making sure that they remain unblocked. Properly mixed alginate should not run, but never take anything for granted in such instances. It is also possible that you’ll need to add a very small amount of water to your alginate if it is too thick. Remember to keep talking to your subject as you spread the alginate, telling her what you’re doing and just letting her know that you’re still there and are paying attention. It is reassuring. Lifecasting requires trust.
Every artist works a bit differently with alginate. You might want to wear gloves—latex, vinyl, or nitrile—or you might prefer to work barehanded. I suggest gloves. The reason is that you can quickly remove them to put on a fresh
pair and instantly have clean hands! Keep in mind that room temperature, water temperature, and your subject’s body temperature, as well as how quickly or slowly you work, will all affect the lifecasting. Ideal working conditions (for me) are a room temperature of 69-72oF (20.5-22oC), 45-45% humidity, 80oF (about 27oC) water temperature, and normal subject body temperature (98.6oF/37oC).
Next:
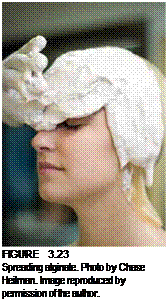
12. Begin to spread the alginate with your hand, starting at the top of the head where the line is drawn between the ears and move downward on the face, leaving the nostrils for last.
When I say spread the alginate, I mean spread the alginate; you will get fewer surface bubbles when you spread rather than just blobbing it on. Be careful not to spread the alginate too thin.
13. When you get to the subject’s eyes (which should be closed already), be certain—and careful—to gently press the alginate into the inner corners of the eye and under the eyelashes with your fingertips. Make sure to do the same with the eyebrows, getting alginate thoroughly into them. If you’ve released them properly, the alginate will come off beautifully, and when you make your stone positive, there should be no eyebrows on it at all. As you apply the alginate, make sure no air is trapped between it and your subject. Use your fingers to follow the contours of your subject’s face with the alginate.
A note about release for your subject’s eyes: Cholesterol cream may cause stinging for some people; I have never experienced it, but if you have any concerns, it is always best to err on the side of caution. Use petroleum jelly instead. Lightly.
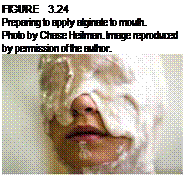
14. Do the same with the sides of the face, stopping just in front of the ears, making sure to get good alginate coverage into all the lines and creases in the face. When you cover the mouth, use your fingers to work alginate into the corners of the mouth and between the upper and lower lips. If your subject’s mouth is slightly open, that’s fine. The goal is
to have the subject’s mouth in a normal, relaxed position.
In fact, if your makeup design includes upper and/or lower lip pieces, having more lip exposed during the lifecast will be beneficial during the sculpture phase of your project.
15. Next cover as much of the subject’s neck as needed for your makeup design. Make your coverage as even and symmetrical as possible. Lastly, cover the nose, being careful to keep the nostrils clear. You might want to use a small craft stick
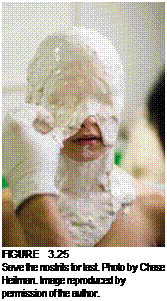
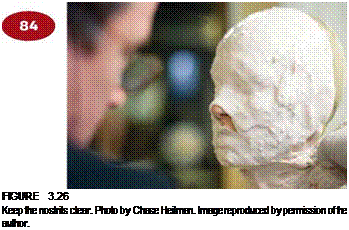 to spread the alginate evenly and as closely to the edges of the nostril as possible without creating a blockage.
16. If the alginate does run, carefully lift it back up over the face. Another method of getting good coverage around the nose—and the nose is a critical part to do well—is to tell your subject to take a deep breath and hold it. Then cover her nose completely with alginate, making sure to get around the nostrils, and then have your subject blow out sharply through the nose to clear the nostril openings of alginate.
17. Quickly use a craft stick to remove any dangling alginate before your subject takes another breath and inhales a bit of alginate. Your subject can then resume breathing normally, and you can further refine the alginate around the nose with your finger or craft stick. I have gotten flawless results this way, with no problems. If you choose to try this method, you might want to do the subject’s nose first, while her mouth is still clear and it is possible for her to breathe through her mouth while you clear the nostrils. Then proceed with the rest of the face, taking care to keep a watchful eye on the nostrils as you work, to make sure they remain unobstructed.
Don’t force alginate between the lower lip and teeth, because the lower lip will protrude and give you a result with which you will probably be unhappy. Talk to your subject as you apply the alginate to remind her not to relax her mouth too much, which could result in a droopy lower lip. A bit of tension should remain around the mouth so the weight of the alginate won’t pull down unduly.
If you work quickly, you should have no trouble covering the entire face and neck with one batch of alginate. Try to have an even layer of coverage on the face, with no thin spots. It is especially important to try to get the alginate as thick as possible around the edges, eyes, and nose. If you find you need more alginate, it is important to know that alginate will not stick to itself once it has set up, meaning that you cannot apply freshly mixed alginate to set alginate and get the two to bond. However, there is a way to make it happen.
A product called Algislo,® available from EnvironMolds, can be used as an alginate retarder, bonder, or softener. This is another Dave Parvin innovation. Algislo is a base that reacts with alginic acid in the alginate to soften it enough on the surface to create a bond between it and fresh alginate. Or if you simply need a bit more working time, you can use it per its directions when mixing the alginate to get a longer working time. You can also create a similar result by
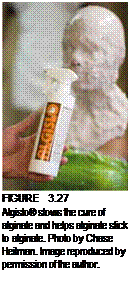
 making a solution of baking soda and water. Experiment beforehand to find the right solution for your needs.
Back to work:
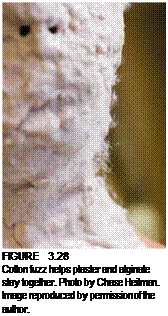
18. Before the alginate sets, add some fuzz—cotton from a roll—while the alginate is still sticky. The cotton fuzz will stick to the alginate, and the plaster bandages will stick to the cotton as well, making sure that your mother mold (the support mold) conforms precisely to the alginate mold. You don’t need much. Press gently so you don’t push all the way to bare skin.
You may opt to use cheesecloth cut into small, single-thickness pieces in lieu of the cotton for the same purpose. Make sure you get cotton fuzz or cheesecloth at the outside edges of the alginate so that the mother mold will adhere tightly at the edges. Otherwise, there is a possibility of the alginate folding in on itself when you are making the positive.
19. Now that the alginate has set, it is time to apply the plaster bandages as a shell—a mother mold—to support the alginate. If you were to remove the alginate now, before the mother mold is applied, you would wind up with a floppy impression of your subject’s face that will not hold its shape. To make the mother mold, you will need to dip the precut strips of plaster bandage into slightly warm water with a pinch of salt. You will definitely want to wear gloves for this process. Warm water will accelerate the cure of plaster, as will a pinch of salt. Terra alba—dried powdered plaster—will also accelerate the cure of plaster to a fraction of its normal set. If the water is too warm, however, you can actually inhibit the cure of the plaster. Fold the plaster strip in half, with the plaster side out. Dip it into the water, then carefully squeeze out some (but not all) of the water before applying it to the alginate. You want the cotton to become soaked so the plaster will stick to it. When you’re finished, there should be a buildup of about four layers of plaster.
Begin by creating an outside edge and work your way in toward the center of the face.
20. Make sure that your plaster strips overlap one another, with the thickest layers on the outside edges. Press gently but firmly to make sure that there’s no airspace between the alginate and the plaster. If you press too firmly, you risk creating a distortion in the alginate and the resulting stone positive. Also, if your mother mold is not thick enough, the weight of the stone when you make your positive may distort the shape of the mold, also ruining your cast.
Here is a good place to discuss in more detail the argument for brushing on plaster with a brush and laying strips of cheesecloth into it for strength instead

