I’ve said this before and I will say it again: To be good at something requires practice. Don’t expect to become sought after as an on-set master of applying makeup appliances if you aren’t really good at it. You must practice, practice, practice!
Just as with most aspects of creating special makeup effects, there is no one prescribed method for applying a transformational makeup, whether it is one piece or multiple pieces that overlap to create the makeup. An obvious first step in applying a prosthetic appliance is to clean the skin using 99 percent isopropyl alcohol (IPA), regular 70% rubbing alcohol, or another skin cleanser that is non-oily. It is imperative that the skin be oil and grease free to make for better adhesion when the appliance is applied.
 Whether you are applying a foam latex appliance or a silicone appliance (or gelatin or urethane cold foam) is not as important as being methodical and careful in the application. Nor is the adhesive you use as important. That being said, the appliance material and the adhesive are indeed important, relatively speaking. A few things about the adhesives you will most likely encounter: The acrylic adhesives, such as Premiere Products’ Telesis® Beta Bond® and ADM Tronics’ Pros – Aide,® go on white and dry clear; they also dry tacky and work best as a contact cement with the adhesive applied to both the skin and the appliance. Both surfaces should be powdered after the adhesive dries; the glue can then be reactivated with 99 percent alcohol at the time of application. The silicone adhesives, such as Premiere’s Telesis® 5, go on clear and dry clear and are slightly tacky when dry, though not to the extent of Pros-Aide,® for example. Silicone adhesives work best when applied to the skin and the appliance is attached before the adhesive dries completely.
MATERIALS

![]()
Telesis® 5 silicone adhesive Q-tips Small cups Telesis® Super Solv® Isopropyl myristate Powder and applicators Beta Bond®
If you are doing a makeup comprising several overlapping pieces, there should be a pre-established order in which to apply the pieces:
1. Before applying any adhesive, position the piece (or each piece one at a time) and check it for a proper fit. Ordinarily, any flashing is left on the piece until application. If the piece needs to be trimmed, do it very carefully; trimming is often best achieved by hand-tearing the flashing away, keeping the blending edges thin and slightly irregular. It is easier to disguise an uneven line than a straight one.
 |
|
|
|
|
|
|
|
|
|
|
|
|
|
![]()
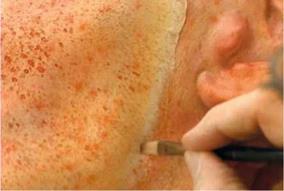

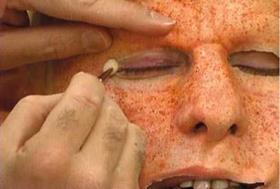
![]()
8. If you are applying a multipiece makeup with overlapping edges, work in the order necessary for the pieces to work and fit correctly. Repeat the appropriate steps.
The "Techniques" section mentioned that dry, powdered Pros-Aide® can be reactivated with 99 percent alcohol at the time of application. With the appliance piece positioned in its final location, lift a portion of the appliance and, with a brush that has been dipped in 99 percent IPA, rewet the powdered adhesive on the skin and press the appliance into place. Proceed with the application, reactivating the adhesive a little at a time until the entire appliance has been glued into place.
When applying large silicone pieces, you can employ a similar process of gluing the appliances in place. As I mentioned, Telesis® 5 dries slightly tacky and should be powdered to prevent sticking to something it isn’t supposed to stick to, such as your finger or a brush, in which case it will try to ruin your life. I credit the following nifty information to Neill Gorton, from whom I learned it, though similar discoveries often happen at the same time worldwide, as has been true of many discoveries throughout history.
Silicone adhesive (chemists, please forgive this gross oversimplification) is essentially nothing more than a very thin, very soft silicone solution. When the solvent carrying the silicone evaporates, what is left behind is silicone. That makes sense, since nothing sticks to silicone except other silicone, and it sticks to us because it’s. . . sticky.


 When the Telesis® 5 adhesive begins to get warm due to trapped body heat caused by the large silicone appliance (silicone does not breathe and thereby traps heat and moisture), it gets sticky again. That tackiness, coupled with suction pressure during application, ensures that the appliance stays in place. The following example illustrates reactivating Telesis® 5 silicone adhesive using nothing more than body heat and a large silicone appliance. At the International Makeup Artist Trade Show (IMATS), January 26 and 27, 2008, in London, Neill Gorton demonstrated the application of a one-piece silicone appliance that was a full head and face appliance. Neill transformed lovely, young, blue-eyed blonde Karen Spencer into an elderly Chinese woman, including painting the appliance, in less than 2 hours! (Patching and seaming were done earlier.)
Because Neill does quite a bit of prosthetic work for television, it was important to streamline the makeup process to suit a television timetable. Typically, a makeup of this size could be (and often is) done in several overlapping pieces, for example:
■ Epicanthic eye-fold piece (x 2)
■ Upper lip piece
■ Ears (x 2)
■ Lower lip piece
■ Chin
■ Cheeks (x 2)
■ Neck piece
 a full head and shoulders bust, from which additional casts would be made for sculpting the individual pieces. This becomes a time-consuming logistics puzzle. In truth, there could be times when the multipiece overlapping appliance makeup is the better way, but not always.
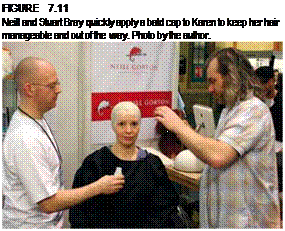
To begin, Neill and Stuart Bray quickly applied a bald cap to Karen to keep her hair manageable and out of the way. Had this makeup been for a show and not a demonstration, the piece would most likely have already been painted; in fact, for a show, it is likely that several appliances would have been created and painted to match. Since silicone is more durable than foam latex, a silicone appliance of this size could easily be used more than once if treated well and properly maintained.
1. The first step is to apply the bald cap.
Obviously, everything needed for the makeup application needs to be arranged in advance so that the operation flows smoothly and without delays while the artists look for something:
■ 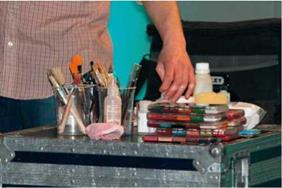 Small scissors
■ Adhesive brushes
■ Chip brushes
■ Skin Illustrator® palettes
■ Telesis® 5 and Telesis® Thinner
■ 99% IPA in a spray bottle
■ Powder and applicators
■ Misc. sponges
Flashing has already been removed from the eyes and ear but still remains around the mouth. The

reason the flashing is left intact is to help hold the piece together and not sag under its own weight.
This makeup is actually two silicone pieces: the main appliance and a small lower lip appliance. Having a separate lip piece reduces potential stress for a thin area or a large appliance and leaves a larger opening to facilitate applying adhesive inside the appliance.
2. Next comes application of adhesive, in this case Telesis® 5 silicone adhesive thinned about 1:1 with Telesis® Thinner. Neill is helped by Rob Mayer of Millennium FX to cover every surface of Karen’s head that will come in contact with the appliance using Telesis® 5. When the adhesive is dry, it is lightly powdered to remove any tack.
3. 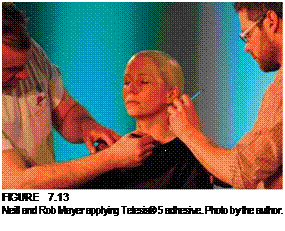

The appliance has been resting on a rigid foam copy of Karen’s head, and together Neill and Rob carefully roll the appliance up and off the form to prevent damaging the silicone GFA
 (did I mention that this is a silicone gel-filled appliance?). Then they place the piece on top of Karen’s head, roll it back down, and reposition it, carefully nudging the appliance into place.
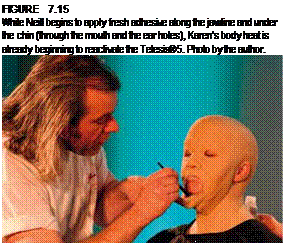
4. While Neill begins to apply fresh adhesive along the jawline and under the chin (through the mouth and the ear holes), Karen’s body heat is already beginning to reactivate the Telesis® 5. Gently pressing and smoothing along the neck helps create suction and good surface contact between the appliance and skin.
5. Neill carefully glues the appliance along the lower eyelid and blends off the edge with Pros-Aide.®
6. After the adhesive has been applied and the piece is in place, Neill places the lower lip by applying a small dab of Telesis® 5 in the middle of the lip appliance. The flashing is left on so that there is more surface area to handle while he makes sure the lip fits properly.
The lip piece is a GFA also, but the envelope is made of plastic cap material, the same blend of polyvinyl acetate that bald caps are made of. The
same mixture of silicone gel (Polytek Plat Sil Gel 10 with a high percentage of softener) is encapsulated between thin layers of bald cap material. By encapsulating with cap material, we can easily blend the edges off to nothing using a small brush and 99 percent IPA.
7. 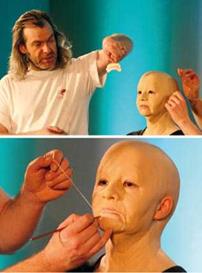 Working from the middle outward, the rest of the lip is glued in place and the flashing melted away with 99 percent alcohol. There is no visible seam line whatsoever.
8. While Neill has been gluing under the chin and along the jawline and gluing the lip, Rob has been using Pros – Aide® to blend the edges around the ears. (I’ll talk more about concealing edges in the next section.)
9. The last thing to do before painting the makeup is to give Karen a way for heat to escape. Because silicone doesn’t breathe, it retains everything, especially body heat, and since this makeup includes a lace-front wig (provided by Campbell Young), the vent hole cut in the silicone and slits in the bald cap will never be noticed when the makeup is complete. figure 7.16

![]()
 It should be noted (here is as good a place as any) that during the casting of the full GFA appliance being applied here, a strip of mesh similar to wig lace but less stretchy—more like tulle—was placed in the mold along the top midline of the head so that there would be very little give to the appliance. On real people, the scalp is attached rather firmly to the skull, and there’s not much stretch in any direction; by doing essentially the same to the appliance, the silicone on the top of the head will not over-elongate and allow the appliance to be ill fitting.
