You will need a variety of products and palettes in your makeup kit so that you can create any of these looks. “Working out of your kit” is a term used by makeup artists to tell you that you will be creating looks with what is in your kit, and not specially purchased products that are given to you by the Makeup Department. You rely on Industry Standards that are in your kit. As we’ve mentioned before, the palettes from Skin illustrator, stacolors, and Reel Creations are Industry Standards that encourage mixing to create a more realistic makeup that is long lasting and abrasion resistant. They are essential in working out of your kit, and for those unplanned makeup situations where you have to work quickly, on set. There will also be many times that instructions are given to you in “makeup slang” for products. Example: you are asked to “use MV005” or “use
Visiora005,” or just “use 005.” These three terms are referring to the same one product, that if you do not know what it is, you will not know that you are being asked to apply foundation using this specific color (Industry Standard). Makeup and film slang abbreviate just about everything, including products, and sometimes instructions. It is confusing at first, but you will get the hang of it. Remember, if you don’t know, ask!
Having trouble remembering what colors to use or which looks to do for a certain period makeup? Tape a color chart and notes on each period inside your makeup kit for a quick reference guide.
Remember color mixing from Chapter 3?
Red: You can mix yellow and magenta to get red.
Blue: Mix magenta and cyan.
Green: Mix cyan and yellow.
Purple: Mix violet and magenta.
Black, White, and Gray: Mix white into black until you get the desired shade.
Knowing combinations gives you so many choices to work with!
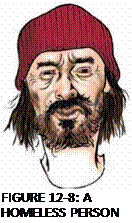
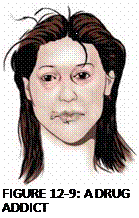
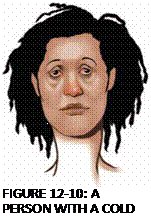
Now separate the three background actor looks of homeless (Figure 12.8), drug addict (Figure 12.9), and illness (Figure 12.10) to see their differences.
Homeless
• Red or sun-damaged skin with various sizes and colors of sun spots.
• 
![]()
 Skin tone has rough, leatherlike surface due to exposure to the elements.
![]()
![]()
• Broken capillaries around the nose and cheeks to reflect substance abuse and weather damage.
• Lesions of various sizes due to illness and injury.
• Ground-in dirt on the body, under fingernails, and even built-up grime from lack of grooming.
• Facial hair would be untrimmed, unshaven, oily, and dirty.
• Darkness, puffiness, and redness under and above the eye.
• Small cuts or scabs on the face, with weathered lips.
• In some situations, the feet must be done as well. The soles of the feet should be blackened with heavy grime, cuts, and bruises.
Drug Addict
• The skin tone tends to be pale and clammy from drug abuse.
• Darkness forms under the eye area from lack of sleep.
• Skin lesions form from drug abuse and illness.
• Track marks on the body from shooting up.
• Bruising on various parts of the body, old and new.
Illness
There are many possibilities for illness: cold, flu, high fever, and disease. You will be directed as to what the illness is, and what the desired effect should be, from the department head or Supervising Makeup
Artist. For this example, your instructions are for a cold/flu.
Cold/Flu: Red tones around the nose with dry, flaky skin. Eyes can appear red and droopy, even watery. Paler skin tone that could be clammy. A dryness to the mouth.
Would you apply foundation or do any corrective makeup on these characters? No. The worse they look, the better, in all three scenarios; and you do not want an even skin tone
Red pencil can be used for rimming the eye area or applying right on the lower lash line for irritated eyes. Several shades of red makeup colors are used for broken capillaries, red noses, and lesions. Have on hand different colors of brown or colors to mix browns for dirt and grime. One black is used to deepen or darken an existing color, plus one white to lighten any existing color or to make grays. Yellow is used for nails, skin tones, and festering lesions or old bruises. Care needs to be taken when working around the eyes. Use a cream – based makeup or a freshly sharpened pencil.
Police Officers
One of the first things you’ll do is clean shave all law-enforcement characters. There should be no facial hair, with exceptions given only by your department head. Mustache’s are allowed for most Police Departments. Sometimes sideburns need to be trimmed. The back of the neck needs to clean shaven. The officers should have a clean-cut appearance. On all shoots, be prepared with a good electric razor, shave
powder stick, astringent of choice, and a small groomer for eyebrows, ears, and nose.
News Reporter and News Anchors
News anchors and reporters usually have a clean-cut appearance as well. If there is a time period issue, you will be told to address that issue. If it is present time, the anchor look is what to aim toward. Work quickly, and spot cover up only the problem areas. Apply a slightly heavy beauty makeup; to achieve a matte, perfect look. Most of the time, lipstick, blusher, eye shadow, and brows are all you will have to do to achieve a news anchor look. The Hair Department will pull the look together. Reporters and anchor types sometimes are pulled ahead of everyone else to go through the Makeup Department because they are usually featured in the scene.
Period Makeup
Refers to a specific time period for the look or trend of that time. Say you are asked to do a period makeup, taking five minutes for each actress because the actresses are in a large crowd scene. If you could do only three things on the actress, what would you do to execute the makeup properly for the following time periods? And what sets each time period apart from the others? We will give you some very general looks for each decade. You must do your own research for each decade to recognize and know a more detailed history of the trends.
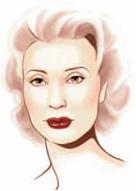
1950s (Figure 12.11): Red lips, pale eye shadows applied to the upper eyelids, nice liquid eyeliner across the upper eyelid next to the lash line, no eyeliner on the lower
|
FIGURE 12-11: A 1950S MAKEUP LOOK |
|
FIGURE 12-12: A 1960S MAKEUP LOOK |
eye lash line, beautifully shaped and filled in eyebrows. Apply lipstick, eyeliner, and brows. A very clean, sometimes innocent, classic look. Note the shape of the lips.
![]() 1960s (Figure 12.12): Pale flat or frosty (but never glossy) lipsticks, strong upper and lower eyeliners, contrasting eye shadows on the eyelids. For example: light shadow on the lid; a deep, dark eye shadow in the crease; followed by a light eye shadow applied on the brow bone. The look is about eyes, so note the style in eye shadow, eyeliner, and brows, as well as the lips. Apply lipstick, eyeliners, and eye shadows.
1960s (Figure 12.12): Pale flat or frosty (but never glossy) lipsticks, strong upper and lower eyeliners, contrasting eye shadows on the eyelids. For example: light shadow on the lid; a deep, dark eye shadow in the crease; followed by a light eye shadow applied on the brow bone. The look is about eyes, so note the style in eye shadow, eyeliner, and brows, as well as the lips. Apply lipstick, eyeliners, and eye shadows.
![]()
 |
|
1970s (Figure 12.13): Women and men in the early 1970s were riding the wave ushered in by the counterculture from the 1960s. Freedom of expression through fashion and makeup was seeping into mainstream society. Men had cast off the “above-the- collar” hair restrictions of previous decades, and began wearing their hair much longer.
In addition, facial hair had become popular, which included long sideburns that often widened as they extended down the face, and full mustaches. Hence, facial hair is a large part of re-creating the ’70s look for men. By the mid 1970s, women kept their hair natural whether long or short. Natural, meaning that it was devoid of hairspray, hairpieces, and setting gels of any kind. Eye shadow was colorful and warm (greens, blues, brown) with or without eyeliner; blush and lips in corals, pinks and frosts. Sun-tanned skin.
Example of a Decade in Makeup:
Makeup varies from the early ’70s to the late ’70s, so questions should be addressed to the Makeup Department head on what look they are trying to create. In general
blues, greens, and brown colors were worn as eye shadows. Makeup was applied, but not heavy or over-the-top. Dark brown tones or black would be used around the eye area as liner, but much softer than in earlier years. Lipstick colors were found in corals, pinks, oranges, and soft reds. If you had only three things to do to create a ’70s makeup, what would they be?
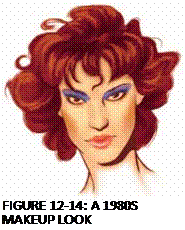
1980s (Figure 12.14): In the 1980s, no matter what colors you were using, makeup was applied heavy. Makeup and hair were used as an art form. Depending on who it was that you hung out with, everyone today has a different take on what colors were used in the ’80s. The colors ranged from the punk look (with black liners and dark eye shadows) to the preppy look (girls with rust or fuchsia-colored lipsticks with purple eye shadow). Of course, Madonna always comes to mind when one thinks of an ’80s look. Three things to use for an ’80s makeup: colorful lipstick, full eye shadow, and blusher. Use lipsticks in pinks, purples, fuchsia, rusts, and reds. Apply eye shadows all over the lid and crease, with a dramatic
but lighter shade to the brow bone. Complete the look with a dramatic contouring blusher across and just under the cheekbone in a matching color to the lipstick.
number along. That’s what happened to me. Still, in a city like Paris, it is hard to break in. In fashion, sending out your newest editorials to Photographers and magazines will keep them updated on your work.
![]()
![]()


![]()
PRO TIP
There is a transition for each decade in the looks and trends. It does not happen at the beginning of each decade, but a few years later. So there is an overlap of trends between the beginning of one decade and the end of the previous decade. Livestyle, environment, economics, and character play into it as well. Know the year if possible to achieve the look. If the project is not being year specific but wants a general feel of a period, choose to go for the obvious trends associated with the decade. Research, research, research! Know the trends by heart, it puts you at a great advantage.
EXAMPLE OF A BEAUTY MAKEUP (STORIES) SHOOT IN PARIS
by Daniela Eschbacher
When I started out in the fashion industry,
I contacted as many Photographers and Stylists as possible to do “test shooting” first to build up my portfolio and contacts. In the beginning, it’s hard contacting everybody and running after magazines. But all that hard work pays off. After working for magazines and commercials, people will get to know you and pass your name and
Preparing for the Shoot
For commercial shoots, it’s important to have all the information necessary from the client or Photographer. The client normally knows exactly what they want, and they expect the Makeup Artist to realize it. When I get a call for a commercial shoot, I will ask the theme of the shoot, the makeup look wanted, if it’s an inside or outside shoot, and how many models. For beauty, it is important to ask the Photographer the reference of the model. The Photographer can either send her portfolio to you by email, or you can look on the agency’s website for the model’s portfolio book.
Once you have all the information, it is time to start thinking about the makeup, products, and to double-check to make sure you have everything you’ll need for the shoot. A lot of times, the Photographer, or even the client, does not know how to express themselves in the form of makeup and colors, so it’s up to me to find the right look. Working in fashion is different from cinema. It can be spontaneous.
Even if you agree on a certain look before shooting, it might all change on the actual workday. On larger, more-complicated shoots, there are meetings before the job. The Stylist knows the clothes, so he or she gives a direction and theme of the shoot.
It can be really helpful to work with an Art Director or Stylist because they see the overall image. Sometimes a simple
![]()
 makeup works much better than one too sophisticated or creative. Meetings are important for meeting the team—it makes the whole process interesting, fun, and human to take the time to sit down and discuss the project. Of course, for commercial jobs, meetings do not always happen.
Designing the Makeup
Designing the makeup—especially if I’m working on personal shoots or beauty stories where everybody counts on the creativity of the Makeup Artist—can be stressful. Even so, I love the work and preparation behind it. Before you start to design, get as much inspiration as possible. The internet is one, but mostly books and paintings. For myself, I love to work with color, so before I think about my makeup,
I think about all the colors that will be used and what atmosphere or feelings those colors will cause to come across.
Once the colors are fixed, I start with effects: shiny or matte, graphic or shady, simple or complicated. Try to prepare as much as possible, but a lot of inspiration is when you first see the model sitting in the makeup chair.
Makeup Kit
Many Makeup Artists have a separate kit for commercials and photography. That includes me. Commercials are not only very tiring, but you work with actors, which is different from working with models. Actors need much more products and attention throughout the day. Therefore, I always have a security kit with me that includes eyedrops, different bases, a nail kit, body
cream and a first-aid kit, to name just a few items. For photography, the makeup kit has a lot of products to create effects, such as glitter, different textures of glosses, all sorts of eyelashes, powders, stones, jewelry, and stencils. Stencils I make myself if possible; the rest I pick up here and there.
Prepping the Model
For fashion or beauty shoots, start with cleaning the model’s face with a mild liquid cleanser (Crealine), and apply, depending on the skin, an appropriate moisturizer. I’m not a fan of heavy creams or moisturizers. Natural oils and vitamins work well without affecting the foundation afterward. Nuxe Multiusage Dry Oil hydrates very well and won’t make the model sweat. It’s very important to check the hands. Nails have to be in good shape. No old nail polish or dry skin. Apply the hand cream. Lips are very important because most models have dry lips. There can be a disaster once the model is in front of the camera, unless you take the time to prep the lips properly. Sometimes I do a soft peeling to take off the dead skin, and afterward apply Elizabeth Arden Eight Hour Cream—a must for every Makeup Artist.
Beauty or Stylized Makeup
Natural colors work best in most beauty makeup. From creamy white to chocolate brown. Warm colors also work well: pink, rose, peach, and oranges. In beauty makeup, you want to look for textures that could be interesting. Glosses on the eyes create a very fresh look. On the cheeks, eyelashes, and eyebrows, gloss will attract
light. Because I work with an airbrush, Temptu products mixed with an SB solution work well.
There are no limits in beauty and fashion. Here are a few examples of different makeups for editorials or a beauty story.
Location Shoot: a Luxury Hotel in Paris
The photographer used artificial light with an emphasis on strong contrasts. So makeup needs to reflect well in the light.
Glosses, Oils, and Shimmers: After cleaning the model’s face, apply natural oils onto the skin and the rest of the body that will be seen. Your goal is to have smooth, shiny, and elegant skin. Let the oils absorb before applying foundation. Use eye products that are moist and creamy in texture, with soft eye pencils to work your shape for the eyes, blending and adding as you go. Purples and chocolate colors work well for this. To increase the contrasts, use a powder shadow in gray or black in only the areas that are needed.
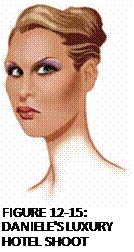
 Mascara and individual false eyelashes applied to the outside corners of the eyes add drama and depth. Foundation is applied next. Follow with loose powder to set. Chanel has a good loose powder. A bronzer was used to sculpt and shape the face. Creating depth and contours is important in a shoot with contrast. The brows were shaped by using three pencils in a mix of brown, black, and gray. Colors you use will depend on your model, but a mix of three colors mimics the different colors of hair found in the brows.

