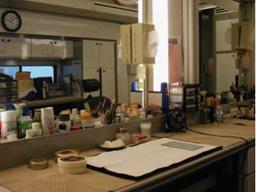
In order to get started, you need to “set up” your workstation with the proper products and equipment. Every workstation varies with each Makeup Artist, but there are Industry Standards for setting up your
![]()
station, with station setup and products that will be consistent from one Makeup Artist to another, no matter whose station you are looking at (Figure 7.1).
Having your station set up with the proper tools, equipment, and products, clean and ready to go, instills confidence in the individual who sits in your makeup chair. This is one of the first moments of critique when working with new people. They will look at your station, your products, and how your kit is set up. Your makeup kit should be clean and organized for sanitary
8 8
reasons and ease of movement during a makeup. Some artists keep their makeup kit on the counter next to them. You will be quickly judged on the condition of your makeup kit. Your products should be current, in good condition, with all batteries fully charged or plugged in. The strength of alcohol must be 99 percent to be effective. Makeup brushes, makeup palette, and tools should be clean and ready. Hand sanitizer (99 percent alcohol) and brush
|
FIGURE 7-1: DEBRA COLEMAN’S MAKEUP STATION Photo courtesy of Debra Coleman, Makeup Artist and member of Local 706, Los Angeles. |
cleaner should be out and within easy reach.
Note: Alcohol is not an EPA (Environmental Protection Agency)-registered hospital-grade disinfectant.
A typical setup for a makeup station is a clean cotton terry towel (colors vary; many prefer white towels only because you can bleach them) placed on the counter in front of you with a Professional Prep Towel on top of the cotton towel (Kimberly-Clark Professional Set Up Towels are the Industry Standard). This is a sanitary setup to keep your products and brushes off the counter, clean and germ free. Your makeup palette, tools, and brushes would go on top of this two-layer setup. Clean your station, makeup brushes, tools, and hands in between each person. Make sure to have a garbage can or bag close by for disposing of garbage. Also have a cloth drape or barber’s cap for protecting clothing or costumes during makeup. Cloth drapes are more comfortable for the individual, but, depending on the makeup you are doing, also have a plastic drape available. Plastic is hotter for the individual.
Sanitizing products: 99 percent alcohol in a spray and dispenser, small bowl or jars for cleaning brushes, hand wipes, gel hand sanitizer, spray water.
Industry Standards: Evian Mineral Water Spray, Glacial Spray Water, La Roche-Posay Thermal Spring Water, Jao Hand Sanitizer.
Canned spray water is a preference. It is a source of clean water for working on the

![]()

![]()
![]()
![]()
face and around the eyes. There will be times when you do not have running water, and you will rely on your canned spray water for a clean source of water.
Grooming equipment: shaving powder,
Tend Skin (Industry Standard), electric shaver, sideburn trimmer (Industry Standards: Wahl, Panasonic), clippers for beard trimming (Wahl), small hair scissors for trimming, nose-hair trimmers (Panasonic), disposable shavers, shaving cream.
Nail care: nail clippers, cuticle trimmers, nail files and orange sticks (do not share nail files/or orange sticks—buy in bulk and give out), cuticle remover, cuticle cream, hand cream, base coat, top coat, quick-dry spray, various nail polish colors, nonacetone polish remover.
Kleenex facial tissue, cotton facial pads (cotton only, due to possible allergies to synthetics), Q-tips, cosmetics Q-tips (the tips are different, made for applying makeup), your makeup brushes, makeup products, and cosmetics.
Note: this is a very basic setup. Every Makeup Artist personalizes their station, so no two look alike, but they will have some of the same products/equipment or Industry Standard products.
It is time for practical experience with applying makeup. For some of these makeups, you will not be given steps to follow, just text. For others, you will be given steps. Time to think, and paint.
There are a million ways to do anything. Find the one that works for you.
—Randy Huston Mercer, New York Makeup Artist
PRO TIP
Corrective makeup is a fine convention if it is used realistically in the company of great lighting. Makeup does not generate light. Makeup only reflects existing light. Makeup cannot get rid of eye bags if they cast a shadow. Makeup cannot light an eye socket if it is in the dark. Makeup cannot disguise pockmarks in a side light.
—Richard Dean, Makeup Artist, New York City
![]()
 For under-eye concealing, choose a product that is emollient and designed for the eye area. These products are lighter, more emollient, and many have reflective qualities that are great for diffusing fine lines around the eye. They glide smoothly onto the delicate skin around the eye. The least amount of tug and pull or stress from application, the better. Do not set with powder. Avoid using powder under the eyes, which can be drying and may emphasize the correction.
Industry Standards: Kanebo, YSL Touche Eclat, Iman, Laura Mercier, NARS.
For concealing or correction on the face, choose a product that is medium weight. Note that all types of concealers (light, medium, or dense) will work on the facial skin—it depends on what you are covering. Your style and what you have to cover will help you choose the product and application, under base or over base. The severer the discoloration, the more need to use a denser product or 100 percent pigment for camouflaging.
For birthmarks, port-wine stains, and tattoos, you will need a two – to three-layer process for complete coverage. This is done before applying a makeup base. This layering of color allows you to cancel out color completely, without any bleed – through. Sometimes a color will bleed up through the cover-up, usually in a gray undertone. You will use the stipple technique to apply color over each layer.
For your first color, use the opposite color on the color wheel to cancel out the discoloration. Your second color is
dependent on how much coverage is needed: (a) if just two layers are needed, your second layer is a matching flesh tone, or (b) if three layers are needed, your second layer is a mauve (red) or orange tone to cancel out any gray bleed coming through from the first layer. Many times there will be a gray bleed or tone coming through the correction. You will see it with your eye and in the makeup mirror. In these situations, you need three layers of color. Your second layer will be to neutralize the gray, and your third layer is the flesh tone. This is 100 percent coverage for those situations with intense color (port- wine stain) or ink (tattoo). These products are 100 percent pigment. They are not sheer, and are designed for camouflaging.
Try: Dermacolor by KRYOLAN and Dermablend.

