by Christien Tinsley
Some of the wonderful attributes these prosthetics offer are undetectable blended edges, translucency (so they look like flesh when a proper tone is mixed), and incredible tenacity to hold during the long day of a shoot.
In order to set up for a prosthetic transfer application, I first like to prep my station. Materials that I like to have with me at all times when doing a Transfer application are:
Transfer prosthetic to be applied Transfer paper Astringent to clean the skin Cotton pads
Shavers (electric and razor)
Shaving cream Scissors
Adhesive (Pros-Aide)
Latex sponges Tissue
Spray bottle (water)
No-color powder Powder puffs Q-tips
99 percent alcohol
Brushes
Sealer (BenNye Final Seal)
 Hand towels Isopropyl Myristate Super Solv
5. ![]() Press firmly onto paper, paying close attention to the edges. This is the most important part of the preparation.
Press firmly onto paper, paying close attention to the edges. This is the most important part of the preparation.
6. Trim as close to the edge of the prosthetic as possible.
7. Peel off plastic top sheet slowly. If parts of prosthetic pull away from paper, lay the whole piece back on paper and repeat step 4 until prosthetic comes off clean.
8. Now you’re ready for application.
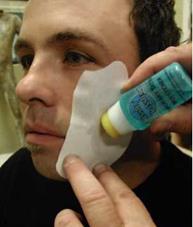
1. Place prosthetic transfer face down on skin, and press firmly.
2. Wet back of prosthetic transfer generously with a Tinsley Transfer moistener (filled with water).
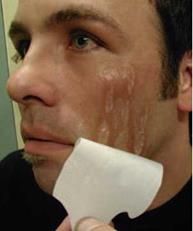
3. Continue wetting the paper for approximately 30 seconds, and slice or peel the backing off. Smooth transfer gently with water, and let dry well. Any visible edges can be blended away using 99 percent alcohol.
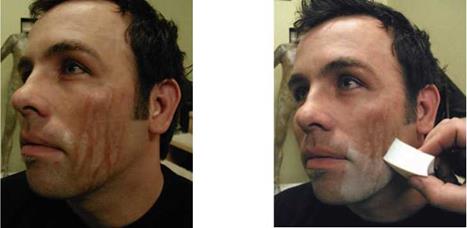
4. Powder generously with no-color powder of your choice. Gently wipe any excess powder, and seal prosthetic transfer with a spray of makeup sealer (we recommend Ben Nye Final Seal).
PROSTHETIC TRANSFER APPLICATION STEPS WITH CHRISTIEN TINSLEY:
1. Lay down with water (Figure 11.27).
2. Peel (Figure 11.28).
3. Blend visible edges (Figure 11.29).
4. Powder (Figure 11.30).
|
FIGURE 11-27: STEP 1: LAY DOWN WITH WATER |
|
FIGURE 11-28: STEP 2: PEEL |
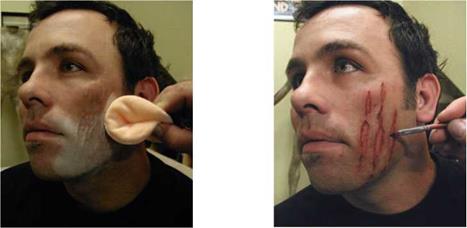
5. Seal (Figure 11.31).
6. Paint (Figure 11.32).
In order to maintain prosthetic transfers on-set, be aware. As with any makeup, things can happen with prosthetics. An actor sleeps hard over lunch, or he rubs his arms on a table while eating, or the scene requires actors to wrestle or sweat or run,
|
і 9 і
|
FIGURE 11-32: STEP 6: PAINT
etc. Always have backup transfers with you, and alcohol, in case you have to remove and apply a new one on-set. Do not remove with oils in the middle of the day because your next one won’t stick. For minor repair, have a premixed color or colors to match the tones and to fill in areas that have rubbed away. If an edge has pulled up or rolled over, you can fill it in
using any kind of filler of your choice (bondo, wax, etc.). Remember, it is always best if you have time to remove and apply a new piece. Things happen—just be resourceful and prepared.
To Remove
Saturate prosthetic transfer with adhesive remover of your choice (Super Solv,
![]() Isopropyl Myristate, Detachol, etc.), and rub gently with remover and dampened powder puff.
Isopropyl Myristate, Detachol, etc.), and rub gently with remover and dampened powder puff.

