Hand-knotting, or ventilating, hair is a skill not easily acquired but one that if mastered could find you in rather high demand. Only the best and finest wigs and hairpieces are completely hand ventilated. Even machine-ventilated pieces that can be purchased from any number of makeup effects suppliers are better than the best wefted ones. (I’ve never seen a wefted beard or moustache; only wigs.)
The first step in ventilating a beard, moustache, or eyebrow is to have the proper tools and materials on hand, not the least of which is a good lighted magnifier. Even a young Turk with 20/20 vision will go wonky in the head trying to focus on individual hairs through a 1 mm hole in fronting lace and then tie a knot in it with a microscopic fishhook on a stick.
But before ventilation can logically begin, you need to have a pattern for a hair appliance to create. Right? Right.
Using a piece of clear plastic wrap, place it over your subject’s face, being careful not to obstruct breathing, and shape it to conform to your subject’s facial structure. Once the plastic wrap is in place, proceed to cover it with pieces of Scotch tape; the form will become somewhat rigid and will hold its shape. Then you can draw on the tape the shape of the beard and/or moustache you will create. This pattern can then be cut out with scissors and placed on a chin block or a cast of your subject’s face. A piece of fronting lace or foundation (opera) lace can then be laid on top of the pattern.
There are different types of netting used for wig making, beards, and moustaches. Veg net, caul net, and power net are too heavy for beard or moustache work and are best for making wig foundations. Veg net has the smallest holes but does not stretch in any direction. Caul net has the largest holes and stretches horizontally but not much vertically. Power net has small holes and stretches considerably in all directions.
Foundation or opera lace and fronting lace are the two varieties best suited for beard and moustache work. Foundation or opera lace has small holes but very little stretch in any direction. Fronting lace is about half the weight of foundation or opera lace and is virtually invisible when applied to the skin as a foundation for a beard or moustache. Because it is so delicate, it is a bit more flexible in stretch than foundation or opera lace but is more apt to tear as well.
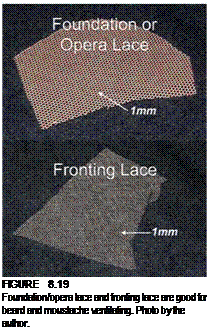
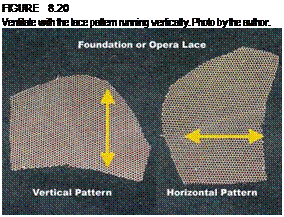 The lace should be at least 1 inch (2.5 cm) longer than the pattern; it will be trimmed later. The pattern should be pinned down with dressmaker pins (on a malleable block) or with transparent tape if you’re using a cast of your subject or if you’re using a plaster or wood chin block.
Position the lace so that the holes are running in a vertical pattern.
1. Place a pin in the top center of the lace, about.25"
(6 mm) from the edge of the pattern.
2. Put another pin in the bottom center of the lace, opposite the top pin, pulling slightly to eliminate any slack in the lace.
3. Do the same for the left and right sides of the lace.
4. Fill in the perimeter of the lace with pins placed no more than.25 to.5 inches (6-12 mm) apart.
Ventilating needles come in several sizes, beginning with the smallest: #00. The bigger the number, the larger the needle. The #00 will grab one hair at a time, whereas #1 or #2 will snag several hairs at a time. As you might suspect, knotting several hairs at once will result in a larger knot, so the larger needles are only to be used where the knots will be covered by subsequent layers of hair. For a moustache, you probably don’t want to pull more than two or three hairs at a time, and for edges, a needle that will pull only single hairs should be used.
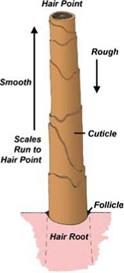
Knowing which end of the hair is the tip and which end is the root is more important for tying wigs than for facial hair, but if you hold a single strand and run your fingers along the shaft you can (usually) tell which end is which. The hair shaft should feel smooth going toward the tip and rough toward the root because of the cuticle direction.
Some hair is coarser than others and it’s easier to tell which end is which. Even when I know which end is which, I have trouble telling the difference; I guess my fingertips just aren’t that sensitive anymore.
I am going to assume you will practice hair tying for a while before you attempt to ventilate a moustache, beard, or wig. Learning how to ventilate on a real piece is likely to be a recipe for disaster. Practice first! It is not as easy as it sounds, I promise. Before you can begin ventilating hair, you will need a few things, not to mention the hair you’ll be tying:
![]()
![]()

 Ventilating handle and needle(s) Foundation lace
Okay, you’ve already pinned a piece of practice foundation lace onto a malleable head block, just as described a few paragraphs ago. Now it’s time to prepare the hair in the drawing mats. Drawing mats resemble really large pet brushes without handles.
1. Lay one side of the drawing mats (they come in pairs) on a surface in front of you with the bent teeth facing away from you.
2. Next, put a small amount of hair on the mat with about 2-2.5 inches (5-6.5 cm) of the root end toward you, hanging over the edge of the mat.
3. Put the other mat on top of the first mat also with the teeth facing away from you, and press down on the mats so the teeth are meshed together, with the hair between them.
4. Now you will be able to draw the amount of hair you want from the mats, hence their name. . . wow.
5. If you haven’t done so already, put a ventilating needle into the handle and then practice holding the way you hold a pencil or pen, rolling the needle’s hook toward you and away from you. Then find a safe place for the needle to rest so it won’t roll off your work surface and break. I use one of my brush holders.
6. If you have a wig clamp with which to mount your canvas block, use it; otherwise you can hold the block in your lap or support it on your work surface with rolled towels to keep it from rolling. However you work, you are almost certainly going to need a lighted magnifier to see what you’re doing and not strain your eyes.
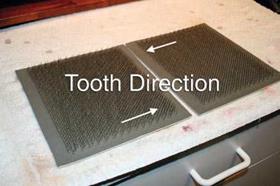
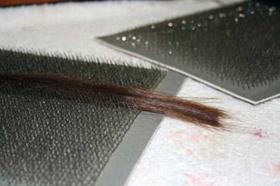
figure 8.22
Place the drawing mat with teeth facing away from you. Photo by the author.
figure 8.23
Put a small amount of hair on the mat with 2 inches hanging over the edge. Photo by the author.
![]()
|
|
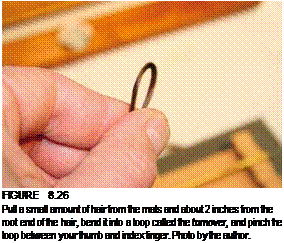
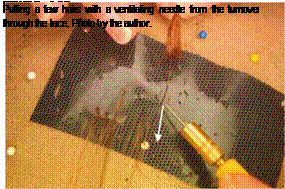
7. Pull a small amount of hair from the mats and about 2 inches from the root end of the hair, bend it into a loop called the turnover and pinch the loop between your thumb and index finger.
 |
 |
For a skill like this I am ambidextrous, so it wouldn’t matter which hand the hair was in for me, but you should hold the turnover in whichever hand will not be your needle hand.
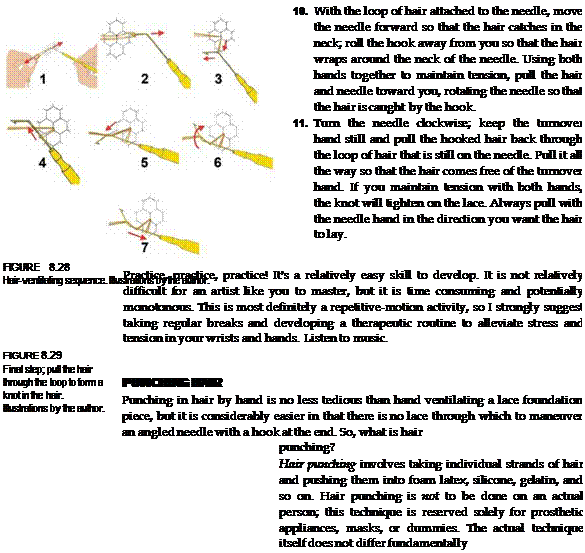
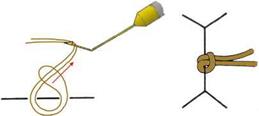
8. With the needle in your hand, slip it through a hole in the lace mesh, passing under the separating fiber and coming out/up through the next hole. Catch a few hairs (which will depend on the size of the needle) from the loop and pull them out just a bit. Moving both hands together, pull the hair back through the holes and out the original hole; be careful
|
|
 |
![]()
![]()
from ventilating hair into lace; the difference is that you’re not tying knots but planting hairs into a material’s surface. You still want to create a mixture of hair colors to create a more natural look just as for hand-ventilating or hand-laying hair. You can even use a ventilating handle for the punching needle.
You can purchase hair-punching needles and holders from various suppliers (see the appendix at the back of this book), but it is also quite easy to make your own, much more inexpensively (no offense to retailers!). I find it easiest to hold a sewing needle with a pair of pliers and cut off part of the eye at an angle with a Dremel cutting wheel, creating a U or a V, and with the same tool, sharpen the edges to points. If the needle is a long one, you might want to shorten it a bit to give it a bit little of rigidity when you push the needle into the surface to which you are adding hair. Sometimes the material, particularly latex rubber (not foam latex) and silicone, can be a bit stubborn, like real skin.

