Follow these steps:
1. Place the positive of your actor’s face, also known as a buck, upright on the sculpture stand so that it will be easy for you to work with. Take a good look at the cast and become familiar with the face.
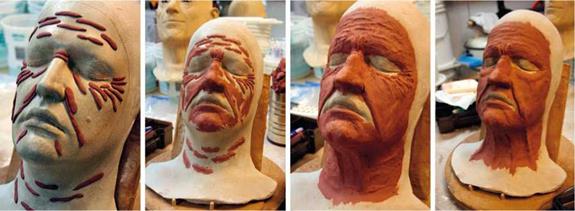
This is the blocking stage, the roughing stage. Neill Gorton suggests simply picking out features and details that you want to translate from the lifecast to the sculpture. Take a pencil and lightly, loosely draw lines on the face that correspond to lines on the cast to make them more obvious for when you begin to place clay on the cast. If you sculpt lines that are counter to where the face will actually move and bend, creases in the face will not move and deform correctly and it will look wrong. It will be wrong.

![]()


![]() Begin to place bits of clay on the cast where you ve drawn lines.
Begin to place bits of clay on the cast where you ve drawn lines.
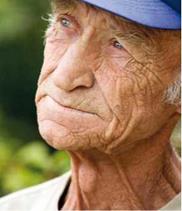
This is the roughing-in stage of the sculpture and can be done with just clay and your fingers. You might find it useful, if not absolutely necessary, to have at least one reference photo visible near your sculpture, with features similar to what you are trying to recreate on your actor’s cast. You might even have several reference images to work from. Try not to have so many that you stop using your instinct, your own vision, for the sculpture. There are so many different ways skin can bend and simply be that your inspiration can become blurred and unfocused. Find one representative inspirational image if you can, and look at others only when you get stuck for a particular shape, wrinkle, crease, or fold.
You might want to use a small tool or two to help press the bits of clay together, but continue to place bits and pieces of clay—Neill rolls out small pieces, "sausages" of clay, he aptly calls them—along the natural lines and folds of the face where the pencil lines have been drawn, along the forehead, the cheekbone, and so on. This is a very early stage of sculpting, you’re blocking it, and it will begin to take a coherent shape bit by bit, piece by piece. At this stage you can work fairly quickly because you are merely blocking out the shape, creating an overall impression of what it will eventually become.
|
![]()
4. At this point, there should be clay over most of the face, and you can use one of your wooden shaping tools to begin sketching lines in the clay where eventually you will place details in the skin: finer lines and wrinkles. Here is where, once you’ve built up clay on the face to create new features—the nose, cheeks, brow, and eyelids—you can begin to blend the pieces of clay together into more of a whole. You’ve placed the face cast on a stand that you can rotate. It is important to be able to rotate your sculpture easily so that it can be seen from different angles quickly (even upside down) to ensure relative symmetry on both sides of the face.
5. Take one of your wooden tools and begin a light crosshatch over the chunks of clay that you placed with your hands; you will "rake" the surface with the wooden tool and start to smooth and blend rough areas into more of a whole. You don’t necessarily want to redefine what you’ve already done but to refine the rough spots, to unify your sculpt. Sculpture is about working from the outside in – creating rough shapes, then making them more and more detailed in stages until you ultimately have a finished sculpt that is ready to be molded and cast in an appliance material.
6. Continue adding clay and blending it until your entire sculpture is blocked, until all the main features and shapes have been created and clay is everywhere that it needs to be. When the sculpture is roughed in completely, you can begin to refine it further.

