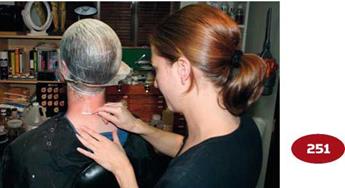
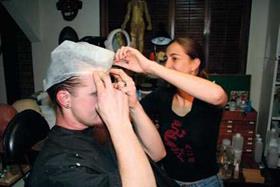
Applying a bald cap is not as easy as making one, but like many aspects of this field, applying a bald cap is not necessarily difficult, but it requires patience and concentration to do it well. Depending on the amount of hair an individual has to hide beneath a bald cap, an application can realistically take anywhere from 1 to 3 hours, including paint and makeup. I think Н/г-2 hours is doing pretty well.
1. Have your subject sit comfortably in a chair that is at a height at which it will be comfortable for you to work. Your subject should wear a loose- collared shirt or a robe that will give you good access to the neck.
2. The next step is to flatten your subject’s hair as flat as possible to her head. The longer or thicker the hair, the more difficult this will be to accomplish. However, there are a few things you can try:
 Simply wetting the hair with water might be good enough for applying a bald cap prior to lifecasting, but it’s not always good for a cap that will be part of a makeup. Whatever you use on the hair, make sure it’s not a greasy product that will interfere with the adhesive you use or with the bald cap itself. Some hair gels have alcohol in them, which will begin to dissolve a vinyl bald cap and throw off your whole makeup. A product called Gafquat, which is a copolymer widely used in hairstyling products and is soluble in both water and alcohol, is frequently used to flatten the hair for a bald cap application. When it dries, it forms a film that will hold the hair firmly in place. Richard Snell used to literally glue the hair down with Telesis® 5 silicone adhesive: a rather expensive way to ensure that the hair would lie flat and stay in place, but it sure did work!
3. Make sure the inside of the bald cap is clean—no powder residue to hamper the adhesion. A bit of alcohol on a cotton pad will wipe away any excess powder; if you’re using a vinyl cap, be careful because alcohol can easily damage the cap. It won’t affect a rubber cap.
4. A cap that is a bit small is preferable to one that’s too large, because it will not fit the crown of the head properly or lie correctly against the nape of the neck. A cap that is too small will result in stretching the skin like a bad facelift if you try to make it fit, so try to have one that will fit well without a lot of effort.
5. Make sure that your subject’s face is clean, especially around the perimeter of the hairline. Clean the skin with an astringent or with 99 percent IPA.
6. Ask your subject to help with the initial placement if you are unable to stretch the cap sufficiently yourself to get it onto the head.
7. With your subject holding a finger on the front edge of the cap, position it so that there are no wrinkles.
8. Telesis® 5 or Pros-Aide® are both good adhesives. With Telesis®, the cap (non-latex) needs to be placed with the adhesive still wet and can be a bit dodgy if you are pulling slightly to keep wrinkles out. Pros-Aide® works best as a contact cement, with the adhesive applied to both surfaces, skin and cap, and allowed to dry before pressing them together.
![]()
9. Start at the front of the bald cap. Apply adhesive to the forehead (center) and to the underside of the bald cap in about a 2-inch (5 cm) strip; allow both surfaces to dry (clear) and then press the cap to the forehead. This will serve as an anchor as you the glue the back of the neck.
10. Fold back the bottom of the bald cap and apply some adhesive; tilt your subject’s head back slightly and apply adhesive to the back of your subject’s neck.
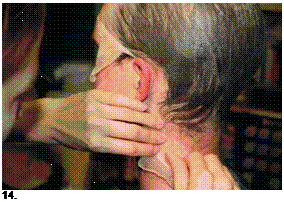
11. With your subject’s head still tilted back slightly, pull the cap down and press the cap to the skin. This will ensure a tight fit and no wrinkles once your subject’s head is straightened again.
12. Next, pick a side, and stretch the cap into position over the ear; with the eyebrow pencil, make a mark above the ear and draw down just behind the ear, following the curve of the helix—the outer flap of the ear.
|
|
|

figure 9.9
With your subject’s head still tilted back slightly, pull the cap down and press the cap to the skin. This will ensure a tight fit and no wrinkles once your subject’s head is straightened again. Photo by the author.
figure 9.10
Next, pick a side, and stretch the cap into position over the ear; with the eyebrow pencil, make a mark above the ear and draw down just behind the ear, following the curve of the helix—the outer flap of the ear. Photo by the author.
![]()
![]()

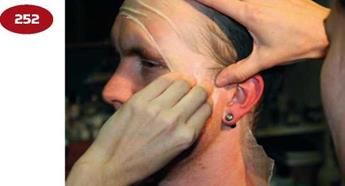
 This drawn line is where you will make a cut to place the cap around the ear. You will most likely need to do some trimming to fit the cap cleanly behind the ear.
13. Apply adhesive about %-inch (1 cm) wide to the skin behind the ear and down along the hairline to where the cap is attached to the neck and to the cap; when both surfaces are dry, have your subject’s head tilt a bit toward the side you’ve just glued, then pull the cap into place and press it to the skin behind the ear down to the neck.
Next, affix the cap in front of the ear by applying glue from the skin at the top of the ear, down in front of the ear, and around the sideburn to where the cap is attached on the forehead. Apply the glue along the hairline about % inch (1 cm) wide. When the glue is dry, pull the cap down and forward to remove any wrinkles, then press the cap to the skin. Repeat steps 12-14 on the other side of the head.
Once the cap has been applied, it must be trimmed of loose and rolled edges. With a good pair of tweezers, lift up the edges that need trimming and cut away
the excess, then lay the cap smoothly back into the adhesive. Do this all the way around the cap; don’t cut perfect straight lines—vary the cut so the edges will be easier to blend.
Blending the bald cap edges can be done one of four ways: Naphtha, acetone, 99 percent IPA, or bondo (Cabo patch). Naphtha, essentially lighter fluid, will dissolve the edges of a latex cap, but it’s a bit harsh on the skin and can cause irritation. Acetone won’t dissolve latex, but it’ll go through vinyl cap material like nobody’s business. It’s also likely to cause some skin irritation, so you might want to use 99 percent IPA on a vinyl cap. It also works very well dissolving edges. For a latex cap, though, what is the other option? Oh, yes. Bondo. Of course you remember that bondo is a mixture of Cab-O-Sil® (fumed silica) and Pros-Aide® adhesive.
If you can’t get the edge down to the level of the skin, build up the skin to the level of the edge. You don’t want to apply the bondo to the cap but to the skin and fill the gap between the skin and the cap.
You can apply the bondo with a small dental spatula or palette knife or even with a small brush. A piece of damp sponge can be used to further blend and texture the bondo to match the skin and the cap. When the bondo has dried, stipple a layer or two of latex over the edges all the way around the cap onto the cap and the skin, using the same kind of sponge you used to make the cap.
When the latex is dry, powder it. Now it’s ready to paint as described in Chapters 6 and 7.
building up ears and nose
 |
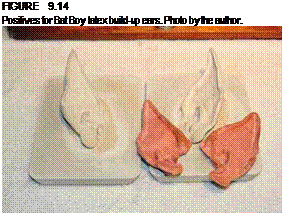
This is not rocket science but prosthetics at about their most primitive. Even so, the results can be very good. Full, over-the-ear appliances can be made by building up layers of latex rubber or plastic cap material (or both) onto a positive of the ear.
It is important when building each layer to be cognizant of the edge thickness because it will have to be blended to seal the illusion of reality. How many layers will you need? At least six and perhaps 10 or 12, depending on the needed rigidity of the appliance. When I made rather large ears a few years ago for a production of Bat Boy: The Musical, I think there were 10 thin layers of latex plus a very thin foam insert up into the pointy helix to hold the ear upright and still be very light.
For a nose, instead of a positive, you’ll need a negative; you could use a positive, I suppose, but the reason a positive works for an ear and not so much for a nose is that ears don’t really have much texture detail, whereas noses often do. Try it both ways and see which you prefer and which looks better. In either instance, blending off the edges and matching the coloration will be the deal breakers.
Before starting any of these tasks, give the positives and the negatives a release of a very thin layer of petroleum jelly to ensure an easier removal of the appliance.
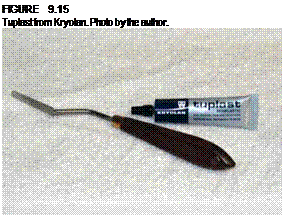
tuplast
![]()
Tuplast is a liquid plastic material from Kryolan. It comes in a tube and can be useful in creating small flexible cuts, scars, blisters, and the like. It can be applied to the skin directly from the tube and can be sculpted on a piece of glass or placed into a stone plate mold that has been sealed and released with a very thin coat of petroleum jelly or vegetable oil. Or you can use a small silicone mold in the same way, but you really don’t need to release it; I’d still give it a thin coat of Epoxy Parfilm. If you intend to apply Tuplast directly to the skin (it is actually pretty decent for creating some burn effects and for creating raised scars), I suggest a barrier layer of PPI’s Top Guard® or Pros-Aide® to make adhesion and removal of the Tuplast easier. Kryolan also makes a remover called Old
Skin Plast Remover that will facilitate removing the Tuplast.
Tuplast is not my favorite material to work with, maybe because I have few occasions to use it, but you should know what’s available in the marketplace. Your kit ought to have a little bit of everything in it; you never know when something could come in handy at just the right time. A lot of material is available for creating the same type of makeup effects that can be done with Tuplast, such as gelatin or skin-safe silicone, which I find much easier to work with and to apply.
nose and scar wax
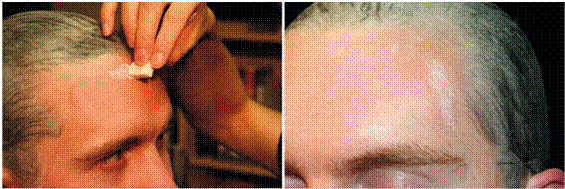
More for theatrical use than for film and television applications, nose and scar wax (also Derma Wax, Naturo Plasto Mortician’s Wax, Bone Simulation Wax, Nose Putty, etc.) is primarily for facial applications to the bony parts of the face: nose, cheeks, chin, and the like. In many ways, theater can be more forgiving than film or television, mostly because in theater we see everything in a wide shot. Unless a character makeup is being seen in an intimate theater setting where the audience is mere feet away from the performers, lighting and distance can help sell a makeup effect that would not fly in a close-up on screen.
When it comes to subtle facial changes, nothing can alter someone’s face as dramatically as the nose. An upturn or downturn of the tip or a bump on the bridge can often change a person’s face enough to make them literally become someone else.
Working with nose wax is not difficult, but like all makeup effects, it should not be rushed or your results could suffer. Be patient and work diligently. You should definitely experiment with this material because, as with everything else, proficiency comes with practice. Once you have a design in mind, whether it’s a new nose, a puffy eye, or some sort of horrific wound, the less material you need to use, the better; it will be easier to shape and blend.

