You can certainly buy ready-made bald caps that are quite good. There are several choices of premade caps. Michael Davy Film & TV Makeup sells WaterMelon® caps. Woochie® caps are ones I’ve used a lot; they’re latex, and Kryolan sells Glatzan L caps. But where’s the fun in buying something premade?!
The first thing you need to have before you can make your own bald cap is something to make the cap on. You can purchase a plastic bald cap head form made of polyethylene from Alcone for about $35 (£19). See the appendix at the back of this book for contact details. Or you can try your hand at making your own bald cap form from one of the full-head lifecasts you no doubt have by now. You know you want to! For material, Kryolan makes an acetone-based vinyl cap plastic called Glatzan L and Glatzan L matte, and I already mentioned New-Baldies®,
Mould Life, and Michael Davy’s Water-Melon®. You can also use slip latex, mold latex, or Pliatex® mold rubber (which is latex) or you could try stippling on silicone that has had a thixotropic agent added to it so it won’t be runny. I’d hold off on this last one until you feel really comfortable working with silicones. Foam latex bald caps are also commonly used. Keep in mind that if you make a latex cap, you will not be able to use platinum silicone such as Alcone 3rd Degree or Smooth-On Skin-Tite® to create any kind of build-up effects or wounds, or if you are doing a platinum silicone lifecast with Smooth-On’s Body Double® or Mould Life’s Life Form because latex will inhibit the cure of platinum silicone and leave you with a gooey mess.
MATERIALS

![]()
Polyethylene bald cap head form
Misc. rubber sponges
Petroleum jelly
Plastic wrap
Sharpie marker
China marker
TWEEZERS
There are two ways to approach making your own bald caps: (1) Make a one-size-fits-all cap, or (2) make a custom cap for a specific individual. I’ll start off describing how to make a custom cap for a specific head and then describe the actual cap process, which is the same for both caps. Foam latex caps are also custom jobs but require sculpting, mold making, and an oven heat cure.

The steps:
figure 9.3
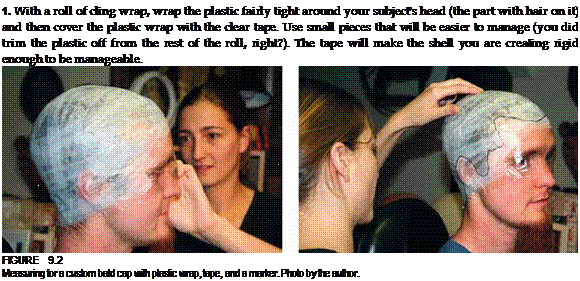
When the tape has been applied, draw an outline of your subject’s hairline all the way around, adding about 1/2 inch (1.25 cm). Photo by the author.
![]()
2.  When the tape has been applied, draw an outline of your subject’s hairline all the way around, adding about % inch (1.25 cm).
3. Carefully lift off the shell and trim it with scissors along the drawn line.
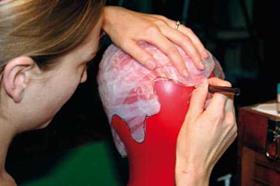
4. Place the shell on the plastic head form and trace the edge with the china marker.
The following steps are the same even if you are making a generic one-size-fits-all bald cap.
FIGURE 9.4
NOTE Place the shell on the
plastic head form and
If you are going to make a bald cap using acetone-based plastic cap material, make sure trace the edge with the you have good ventilation, wear a respirator, or both. china marker. Photo by
the author.
5. Remove the clear shell and rub a very light layer of petroleum jelly on the surface of the head.
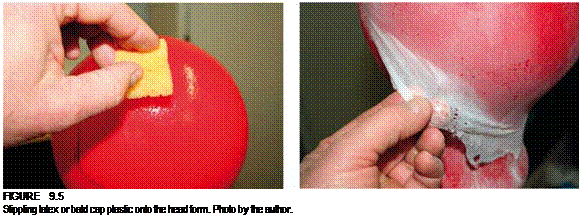
6. Pour a small to moderate amount of the bald cap material of your choice (cap plastic or latex) into a small shallow cup and stipple a thin layer over the cap area on the plastic head with a piece of rubber sponge.
7. When the first layer is dry, stipple on another layer over the first one; repeat this step until you have five thin layers.

If you made a vinyl cap, it can be powdered and removed when the final layer is completely dry; if the cap is latex, let it sit for 24 hours to fully cure. Otherwise, it could tear because it is thin and weak. Powder both the outside and the inside, being very careful not to let the edges roll, because the material, both vinyl and latex, will stick to itself and could be difficult to separate.
figure 9.6
Powder the cap as you remove it from the form to prevent edges from sticking together. Photo by the author.
![]()
