Matrix molds are probably the best, most accurate molds you can make, but they could be overkill for some applications due to the amount of work that goes into making them. You decide. The process begins similarly to the way you make a two-piece case mold for a sculpture, with the sculpture lying horizontally on a bed of clay covered with plastic wrap. I mentioned this at the beginning of the chapter, but in case you’ve already forgotten, read through the following steps, then make sure you have all the tools and materials necessary before proceeding.
1. If you haven’t already done so, mark the dividing line on the sculpture, taking potential undercuts into account and avoiding them.
2. Place wood blocks around the sculpture or build a foam-core structure around the sculpture to support the WED clay wall you’ll build. Using wood blocks or foam core first simply allows you to use less clay in creating the wall around the sculpture.
3. Cut slabs of clay with your cutter and begin to lay them around the sculpture, conforming to the dividing line you drew.
4. Take a scraper tool and begin to smooth out the clay around the sculpture, being careful not to get too close to the sculpture and thus risk damaging it. As with all such projects, start with broad strokes and then add details once the broad strokes are completed. In this case, get rid of rough patches and lumps with a serrated scraper, then use a smooth scraper to further refine the clay wall; this wall doesn’t need to be perfectly smooth right up against the sculpture, because we are going to do something we haven’t done before.
![]()
5. Place a piece of paper towel over the top of your sculpture and wet it with water from a spray bottle. Cover as much of the sculpture as you can with wet paper towel, gently and carefully pressing it into the contours of the sculpture.
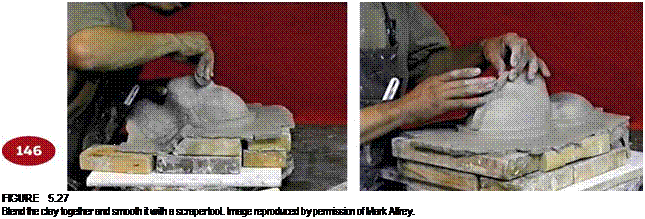
6. Cut thin strips of clay about % inch thick and place them around the sculpture, then cut thin slabs to cover the rest of the sculpture.
7. Blend the clay together and smooth it. Be very mindful of undercuts with this clay covering, and avoid making them. You should always be aware of the potential for undercuts at every stage of your projects. Remember, an undercut is any curve or indentation you can’t see when looking straight down at your sculpture.
8. 
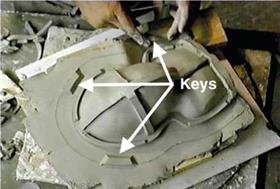
Once the clay is smooth, cut %-inch strips and place them down the middle of the sculpture and across, perpendicular to the strip on the midline. These will become registration keys for the silicone and support shell.
figure 5.28
Add clay strips to be registration keys for the silicone mold and support shell. Image reproduced by permission of Mark Alfrey.
9.  Next, cut Clinch (7 mm) strips and lay them around the base. Trim them to about 5 inches long and space them around the base about 5 inches (12.7 cm) apart, all the way around.
In case you haven’t yet figured it out, the clay with which you have covered the sculpture and built keys will eventually be replaced entirely by silicone. A matrix mold is a precisely aligned mold with a silicone interior and rigid exterior shell. Here I am describing only one method of making a matrix mold; every artist has his or her own way of doing it—how they place keys and so on. The effectiveness of the resulting mold made by different artists remains the same despite slight differences in methodology.
 |
|
|
|
|
|
|
![]()
![]()
![]()
![]()
![]() When I first began working with Ultracal I did not wear gloves. Then one time I did six lifecasts in one day, and as I was mixing the Ultracal to pour for the sixth positive, I noticed the Ultracal was turning pink. . . Now I wear gloves and always put lotion on my hands when I’m done for the day. You should, too.
When I first began working with Ultracal I did not wear gloves. Then one time I did six lifecasts in one day, and as I was mixing the Ultracal to pour for the sixth positive, I noticed the Ultracal was turning pink. . . Now I wear gloves and always put lotion on my hands when I’m done for the day. You should, too.
17. You might want to put some serrations into the smooth surface for hand traction when handling the mold. The point about smoothing the outer layer is purely aesthetic. Sure, it’s a mold that perhaps no one but you will ever see, but I can’t stress enough that anything worth doing is worth doing well; everything you do should be done with a sense of artistic pride in the craftsmanship, even if only you will appreciate it.
18. Once the mold has fully cured and has begun to cool, remove the clay and clean up the edges of the stone mold. Next, remove the wood supporting the horizontal clay wall and remove that clay as well.
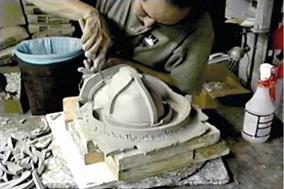
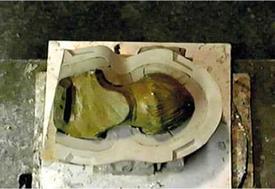
19. Carefully turn the mold over and support it with wood blocks. Remove the clay making up the dividing wall, but save any clay that was surrounding the sculpture; you will need it again. If any of the clay accidentally comes up, put it back in place. You should have something that resembles the photo.
20. You are going to do the same thing on this side that you did on the other. Place a piece of paper towel over the top of your sculpture and wet it with water from a spray bottle. Cover as much of the sculpture as you can with wet paper towel, gently and carefully pressing it into the contours of the sculpture.
21. Next, cut 1-inch (2.5 cm) strips of clay and lay them on top of the strips from the other side of the sculpture. Then cut thin slabs to cover the rest of the sculpture. Smooth it and place clay strips for keys.
Place small pieces of clay for pry holes (to facilitate removing the mold halves) and then brush a light layer of petroleum jelly over all the exposed stone surfaces.
Cut wider strips, about 2 inches (5 cm), and place them around the perimeter of the mold as a support wall; you might need to press the clay down onto the bottom of the mold to help hold it in place. Then spray it with Crystal Clear and Dulling Spray.
Mix a batch of Ultracal as you did for the first layer on the other side of the mold and brush it on. This layer will be about % inch thick when you are done.
After your first layer of Ultracal has cured and begun to cool, mix another batch of Ultracal to use with pieces of burlap. Overlap the burlap pieces to aid in reinforcing the mold. Build up three or four layers of burlap so that the total thickness of the mold will be about 1 inch (2.5 cm) overall—strong but still fairly lightweight.
![]()
26. As the Ultracal begins to set, smooth the stone so that there are no rough spots; remember, you might want to put serrations on the surface so the stone won’t be too slick and possibly slip from your hands.
27. After the stone has cured and cooled, remove the clay wall and clean up the edges with sandpaper or a rasp.
28. Using a pair of large screwdrivers or some similar tools, find the pry holes and carefully begin to separate the support mold halves, working at opposite points on the mold. It is very important to take care not to damage the sculpture or the mold.
29. Remove the paper towel and any clay from the sculpture. Toss the paper towel, but keep the clay handy. Using a soft brush and water, clean any remaining clay from the surface of the sculpture.
30. Use a smooth detail tool to repair the day around the edges of the sculpture, smoothing it and filling any gaps.
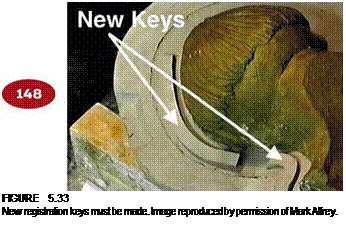
31. When you’ve done that, you can do one of two things because we need another set of registration keys. You can cut long thin strips of clay, about % x % inch, and lay them along the top of the embedded clay wall, with a gap about every 6 inches. Or you can use a carving tool and dig a %-inch trench in the embedded clay, leaving a gap every 6 inches or so. Then spray the clay and sculpture with another coat of Crystal Clear.
32. Remove all the clay from the inside of the mold half and, along with the clay you already removed, weigh it.
33. Clean the inside of the support case mold and scrape down any sharp edges on the keys that might have been formed by Ultracal leaking over their edges.
34. Take a Sharpie and mark several dots at low points all around the mold where you’ll drill bleeder holes; these holes will allow air to escape when silicone is poured into the mold as well as provide an escape for excess silicone. Make sure to brush away any Ultracal dust so that the bleeder holes will remain clear.
|
|
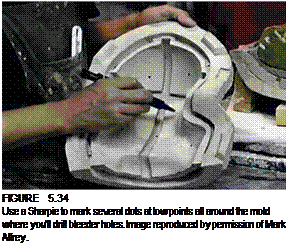 figure 5.35
Plug bleeder holes with drywall screws or clay. Image reproduced by permission of Mark Alfrey.
![]()
35. Next, drill a 1-inch hole in the case mold at the highest point of the mold. This is the point at which you will fill the mold with silicone. You will be using the mouth end of a large plastic soda bottle as a funnel that you will hot-glue into the 1-inch hole you drilled. Or instead of using a plastic soda bottle as a funnel, you can drill a 1 %-inch hole and use a section of a cardboard paper towel roll as your pour point, hot-gluing that in place. Whichever method you decide to use, you might find that you will have to tweak the hole size a bit to get your funnel to fit before gluing it in place.
It isn’t actually important how big the hole you drill is, though it should probably be between 1 and 2 inches in diameter so that there’s plenty of room for the silicone to pour at a decent rate. What’s important is that the hole you make allows whatever you use for your funnel to fit.
![]() Brush the interior of the mold with a light layer of petroleum jelly. The petroleum jelly acts as both a sealant and a release agent, making it far less likely that the silicone will find anything to grab onto and not want to let go.
Brush the interior of the mold with a light layer of petroleum jelly. The petroleum jelly acts as both a sealant and a release agent, making it far less likely that the silicone will find anything to grab onto and not want to let go.
![]() The other half of the mold containing the sculpture should still be supported; carefully place the mold over the sculpture and close the mold, being careful to come straight down so the sculpture is not accidentally dinged by the case mold.
The other half of the mold containing the sculpture should still be supported; carefully place the mold over the sculpture and close the mold, being careful to come straight down so the sculpture is not accidentally dinged by the case mold.
![]()
 Clamp, tape (duct tape or gaffers tape), or strap the mold tightly shut. There is still an opening at the base of the case mold. This is where casting material will be poured once the mold is completed and a casting of the sculpture will be made, but for now, we need to seal it so that silicone won’t flow out of the opening once it’s been poured in from the top. Cover the opening with WED clay and then use several pieces of plaster bandage to cover the clay. Don’t press too hard or it could stick to the Ultracal too much. Leave a "tab" sticking out so that you have something to grab and pull when it’s time to open the mold.
40. If you haven’t weighed the clay yet, do it now, using either a triple-beam scale if you’re "old school" or an accurate digital scale. You need to know how much silicone to mix without being wasteful. Here is a formula I got from Mark Alfrey: 100% clay = 70% silicone. Whatever your clay weighs, multiply that number by.7 to get the weight of the silicone you will need. You will most likely want to use a tin RTV silicone, not a platinum RTV silicone. Save the platinum silicones for making prosthetics, not molds; it could be too expensive.
41. Use hot glue to seal the seam of the case mold all the way around.
42. Now it’s time to mix the silicone. Which silicone you use is up to you, though it should be a condensation-cure or tin RTV silicone, not an addition-cure or platinum RTV silicone.
I suggest that you do some research on your own to find a silicone that works best for your needs. I like Smooth-On’s Mold Max 30 (pink), though Silicones, Inc., Polytek, and others also offer a variety of exceptionally good mold-making silicones. Things you will want to consider are shore hardness (how soft or hard
![]()
the material is when fully cured), shrinkage when cured, pot life (how long you have to work with it before it begins to set up), and demold time (how long you have to wait before you can safely remove the mold when it is fully cured). You will find a listing of manufacturers in the appendix at the back of this book.
TIP
100% clay = 70% silicone
Whatever your clay weighs, multiply
that number by.7 to get the weight of the
silicone you will need. For example, if your clay
weighs 1,200 grams, you’d multiply that by.7
and see that you will need 840 grams of
silicone: 1200 x.7 = 840.
When the silicone is mixed, air bubbles are created that you do not want to negatively affect your mold. Ordinarily you would de-air or de-gas the silicone in a vacuum chamber, but
that will not work here; for one thing, the mold is too big and a chamber large enough to hold the mold would be extremely expensive, not to mention the way a vacuum could affect the WED clay.
43. Pour the silicone slowly in a thin stream into the mold funnel from a height above it; this will stretch and break up most of the air bubbles.
This could require some practice so you don’t end up pouring silicone all over the place. If you’re uncertain about your ability to hit a target from above, practice first!
You also want to be using a silicone rubber with a long cure time; that will allow any remaining air bubbles to rise in the mold, away from the surface of the sculpture, where you absolutely do not want them.

![]() As the silicone fills the mold cavity, it will begin to seep out the bleeder holes. As each hole begins to leak, plug the hole with a drywall screw or a piece of WED clay.
As the silicone fills the mold cavity, it will begin to seep out the bleeder holes. As each hole begins to leak, plug the hole with a drywall screw or a piece of WED clay.
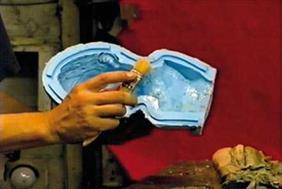 The silicone cure time should be anywhere from 16 to 24 hours, depending on which silicone you used. When the silicone is fully cured, remove your funnel and cut away the excess rubber. Then remove the plaster and clay from the bottom of the mold.
The hot glue may be a little trouble, but if you spray it with Superglue activator, it will soften and be easier to peel away.
Then carefully open the mold with the proper tools inserted into the pry holes, just as you did before.
The next step is to remove the clay from the other half of the mold and weigh it, as you did for the other half. Repeat steps 33 through 40, remembering to
![]()
 brush a light coat of petroleum jelly over the silicone as well as the exposed stone of the case mold before clamping the mold shut; you don’t want the silicone bonding to itself!
47. When this silicone has cured, you can open the mold and begin removing the clay sculpture. Be careful not to damage the silicone as you’re digging out the clay. You should use dull wooden tools as you get close to the silicone.
48. After you’ve removed all the clay, separate the inner silicone mold from the outer rigid case mold. Cut off the little rubber protrusions (called sprues) from the bleeder holes so that it will be easier to reseat the silicone into the case mold. Cut them off flat by pulling on them so they stretch, and then cut them.
49. Spray 99 percent alcohol, mineral spirits, or lighter fluid—something that you can use as a solvent for the clay that will not damage the sil- icone—into the silicone and then brush out the remaining clay with a chip brush that has the bristles cut down.
50. Do this to both sides of the mold, and dry the solvent by patting with paper towels and a blow dryer if necessary. Then seat the silicone molds back into the corresponding case mold halves. Feel around the silicone to make sure that there are no spaces between the silicone and the stone. When you’re certain the silicone and stone are seated together perfectly, put the mold halves together and strap the mold closed. When you look into the mold, you should not be able to see a noticeable seam line where the two silicone halves meet.
Your matrix mold is finished and ready for production!

