Many companies sell pre-made gelatin blocks that come in a variety of colors which you can use “as is.” As well, many provide a clear block that you can add your own colorants to. This would be the best place for any Makeup Artist to start until you understand the processes and the medium.
Gelatin formulas are as unique as the artists that use the material; however, if you’re determined, understand that whatever formula you find that works for you may not work for your friend across town. Why? Many reasons. For example, you may not buy raw materials at the same place, so the gelatin may be a little different, Or the
 sorbitol or glycerin may be formulated differently and your method of processing the gelatin into your mold may differ. Any or all of these things may throw a wrench into your “formula,” but you’ll learn this as you go.
A general place to begin would be to have on hand some gelatin, sorbitol (which increases the tear resistance while being less affected by humidity; usually sold as a 70 percent solution), and glycerin (which replaces much of the water that would be used in food formulas), along with a good scale to measure out your ingredients. These three ingredients are used in most basic formulas, and can be obtained from internet special-effects supply houses or any of the brick-and-mortar special-effects supply houses across the nation. As a side note, sorbitol is sold in two forms: a powder and a liquid. The liquid is the sorbitol already in solution, and it’s the form I like better for its ease of use. The liquid is usually sold as a 70 percent solution.
Reiterating and many words of caution: ingredients are not necessarily the same from vendor to vendor. The supply of gelatin, the mix of sorbitol, the glycerin—can all vary. I can’t urge you enough to make a chart of your ingredients and procedures, and to write down everything—including proportions of ingredients, time of day, time of year, weather conditions, type and wattage of microwave. All these things can have an effect on the end result. The object of all this work is to create a batch size that works for the appliance you’re making— let’s say, a prosthetic nose.
CAUTION: Pigments should be FDA approved for use in cosmetics. Pigments from an art-supply house may not be suitable for cosmetic use—so don’t use them! Safety is your responsibility.
Heating the Gelatin
Melting the gelatin into a liquid is necessary to both homogenize the mixture and break down the powdered gelatin so that it can be poured and molded. Usually this is done in a microwave for both convenience and speed. CAUTION: hot melted gelatin is dangerous, and can blister and severely burn your skin. So be extremely cautious, and protect yourself with both gloves and goggles.
![]() Microwaves come in different wattages, so a setting of #4 for 15 seconds on one machine is not the same as #4 on another machine. Read the ratings, usually written on the back of the appliance somewhere, and write this information down.
Microwaves come in different wattages, so a setting of #4 for 15 seconds on one machine is not the same as #4 on another machine. Read the ratings, usually written on the back of the appliance somewhere, and write this information down.
A double boiler can also be used, but will take a bit more time. Remember to put your gelatin into a metal bowl or container, and place it into the water of the lower boiler.
Do not use bare hands—it will burn you. Instead, use gloves for hot work, or a long gripping tool (pliers) to place and remove your container of melted gelatin. If you allow gelatin to boil with either method, the gelatin will break down, making it useless. So don’t burn it. Allow your gelatin appliance to cool in the mold. Most artists will put the mold in a refrigerator (not the freezer) to speed up the process.
Molding Gelatin
UltraCal 30 Molds are the best place to begin because they are economical, and many people are still using them today. For the advanced user, Epoxical gives a better release and won’t break down as easily. But it is more expensive, and needs more time and skill to make. Silicone molds are also used, so there are a variety of techniques to choose from. All have advantages and disadvantages, as with any material—you just have to find what fits your situation, pocketbook, and skill level.
Keep in mind that your molds should be kept warm. A cold mold will solidify your gelatin before it can flow into all the areas you require. It’s also best to fill your molds with the negative side down, placing your positive
side into it. You will probably have to vent your mold to eliminate voids, air traps, or to prevent hydraulic back pressure from squashing your mold’s halves together. Many Makeup Artists use a sealing coat on their UltraCal molds, but some do not. Some use a thin film of Vaseline for a mold release. Others may use PAM cooking spray or Epoxy Parfilm.
Assuming that you’ve flashed your mold as you would for a foam latex appliance, powder the gelatin as you remove it from the mold. Use no-color powder, talc, or cornstarch. Leave any flashing on the piece after removing it from the mold. This will be a great help in maneuvering the gelatin and handling the piece for application. Gelatin appliances should be kept on a form to keep them from losing their shape, so have either a vacuform copy of the positive or just a plaster copy. Remember to clean the finished pieces thoroughly with alcohol or acetone before application.
What your makeup kit should contain for gelatin applications:
Acetone
Brushes
Sponges
Green Marble Sealer Pros-Aide Witch hazel No-color powder Skin Illustrator
Prepping the Appliance:
1. Flip over the wound so the bottom side is up.
2. Clean the gelatin piece with acetone using a brush or sponge.
3. Let dry thoroughly.
4. Lay flat on underside, then apply two to three layers of Green Marble, drying each layer.
Applying the Gelatin Piece:
1. Cleanse (using toner) the area of the face or body that the gelatin piece is being applied to.
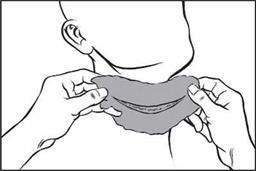
2. Fit the gelatin appliance to its intended position; in this case around the jawline (Figure 11.33).
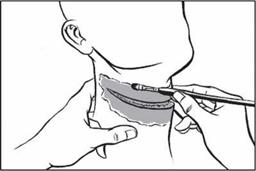
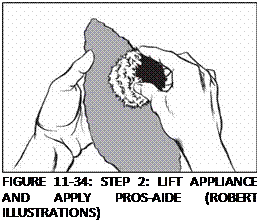
3. Lift areas of the appliance, and apply Pros-Aide with a sponge (Figure 11.34). Allow to dry most of the way clear. Press into place. It’s best to start from the inside pressing outward. If you fold an edge, use a little alcohol on a brush, and lift the edge to replace it correctly.
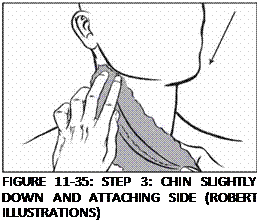
4. Have chin slightly down, and attach one side at a time (Figure 11.35).
5. 
![]()
 Take flash off with witch hazel (Figure 11.36).
|
|
![]()
6. Gently blend edges with witch hazel— it’s easy to overdo this step and dig a hole in your appliance edge.
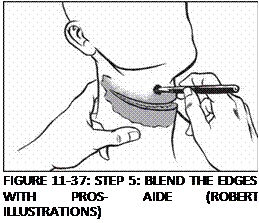
7. Blend the edges with stipple sponge and Pros-Aide (Figure 11.37).
8. Apply Pros-Aide all over the whole piece.
9. Let dry completely.
10. Use no-color powder around edges.
|
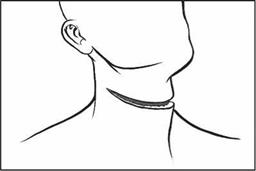
FIGURE 11-38: STEP 6: PICTURE OF FINISHED APPLIANCE (ROBERT ILLUSTRATIONS) |
by Kenny Myers
Now that your appliance is prepped and applied, you’re ready to paint. If you’ve done your homework and have properly made your appliance (including the intrinsic coloring) and paid attention to translucency (the balance on intrinsic coloring to the mass of gelatin), the piece should require only a series of color stipples and wash passes using Skin Illustrator (my favorite). Taking a standard wedge of white makeup sponge and tearing holes in a random pattern on the application side of the sponge gives an excellent pattern on the appliance. Overstippling with this sponge will result in a natural soft skin pattern. Be careful not to use too opaque a mix of color, but instead, soft washes of color on the sponge.
Another favorite technique of mine is a hand-painted scumble, instead of using orange or red stipple sponges. This technique uses a round natural-bristle brush, usually around a #8, and the color is placed on the appliance in what may seem like a random pattern. However, if you closely study most skin, you’ll see variations of color density and color placement everywhere. This will help “sell” your paint job! Most Makeup Artists are people watchers—not only for behaviors, but also character traits and, most of all, variations in individual colorations. This is a great pastime when sitting around a mall or at any event gathering.
This brings up an issue for those of you wishing to move into the professional
![]()
 end of the industry. I say this only because, if you are planning a career in the makeup industry, have a “for sure” before you have a “maybe.” I’ve seen many Makeup Artists ignore a tried-and-true method to keep themselves in the technological limelight—only to fail miserably in the 11th hour, when it was too late to correct the situation, and get themselves a reputation for irresponsibility. This warning cuts across all material usage or processes, no matter what they are. This is an issue of responsibility for your contract with your employer.
By permission: Kevin Haney, published in Dick Smith’s Advanced Professional MakeUp Course, Update #3, page 4.
Kevin also notes that sorbitol makes gelatin firmer and less elastic. At the time of The Believers, Kevin used a formula that included 7 grams of gelatin (275 to 300 Bloom), 38 grams glycerin, 2V2 grams water, flocking, face powder, and zinc oxide.
www. gelatin-gmia. com/index. htm
Gil Mosko created GM Foam in 1987 to meet the needs of the Makeup Artist for a more user-friendly foam latex. Mr. Mosko has numerous awards, and has developed foam latex that has become the standard in
the industry. Gil explains how to approach working with foam latex, and how to make a gypsum mold.

